
Appearance
Multi-Client (Multi-PC) Setup
Exaplay 3 supports multi-client deployments where one master PC coordinates playback and content across multiple client PCs connected on the same network. This enables large-scale projection setups, multi-screen installations, and distributed show control.
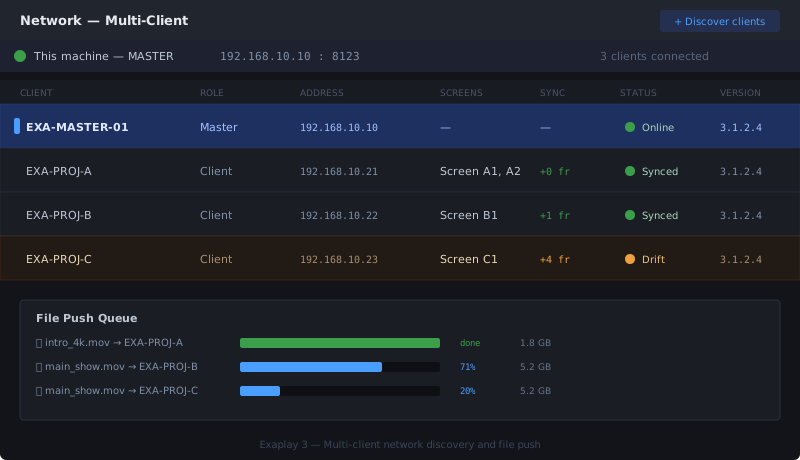
Quick Setup — Step by Step
This is the fastest path from "several PCs" to "one synchronised show". Each step links to the detailed reference further down.
- Connect the machines. Put every PC on the same network subnet and start Exaplay on each. On the master, make sure the NETWORK tab is visible — enable Multi-Client Mode in
Settings → Communicationif it is not. Open the required network ports in Windows Firewall on every machine. - Find the clients. On the master, open the NETWORK tab. Remote instances appear automatically under Systems within a few seconds (auto-discovery). Click refresh if one is missing.
- Make a machine a client. Select a remote system and toggle the Role checkbox to mark it as a client. Give it a friendly Name so it is easy to identify (Client Mode, Display Name). The client's own UI shows a Client Mode — Read Only banner.
- Assign the displays. In OUTPUTS → Screens & Fields, assign each client's monitors to screens just like local outputs. For a panorama spanning two PCs, assign displays from different machines to one screen (cross-machine panorama). Do this before copying files so Smart Sync knows what each client needs.
- Copy the project and media. Click Copy Files in the NETWORK tab. The master pushes the
.vppand the required media to every client and each client loads the project automatically (file synchronisation). Enable Smart Sync to send each client only the media its screens actually use. - Turn on Playback Sync. Toggle Playback Sync in the NETWORK tab so Play / Pause / Stop / Seek, composition switches, and cues are broadcast to all clients with frame-accurate latency compensation. Use the per-client checkboxes to include or exclude targets.
- Verify. Each system card shows a sync-quality and health badge. Confirm every client reads 🟢 in-sync. After project changes, push again with Copy Files or reload everyone with Restart All.
Roles in one line: the master is the PC the operator works on; a client is a read-only PC that renders the master's content on its own displays. The rest of this page documents each step in detail.
Roles
| Role | Description |
|---|---|
| Master | The PC running the main Exaplay UI where the operator works. Controls playback, assigns screens to remote displays, and pushes content. |
| Client | A remote PC also running Exaplay. Receives playback sync commands and renders content on its local displays. Designated via the Client Mode setting. |
Client Mode
An Exaplay instance can be designated as a client by enabling Client Mode. This can be done in two ways:
- From the client's own Settings:
Settings → System → Client Mode - From the master's Network tab: Select the remote system in the NETWORK tab, then toggle the Role checkbox in the inspector panel.
When client mode is enabled:
- The instance is marked as a "client" in the master's NETWORK tab (green badge).
- The master's Copy Files operation automatically transfers the
.vppproject file and all sync folder media to this client. - After file transfer, the master triggers
project.loadso the client automatically loads the master's project. - The client does not need to maintain its own
.vppfile — it receives everything from the master. - The local UI shows a Client Mode — Read Only banner so operators can see immediately that the machine is following a master system.
- Editing actions such as saving, timeline changes, output editing, and other project-authoring tools are disabled on the client.
If you need to break a machine out of client mode on-site, use Convert to Master from the read-only banner or turn off Client Mode in Settings → System.
Display Name
Each remote system can be given a custom display name for easier identification:
- From the client's own Settings:
Settings → System → Display Name - From the master's Network tab: Select the remote system, then type a name in the Name field in the inspector panel.
The display name is stored on the remote system's configuration and persists across sessions. When set, it replaces the OS hostname in system cards and the inspector title.
The master's NETWORK tab also shows a sync status summary on each system card:
- ✓ synced — all files were transferred successfully
- ⟳ copying… — transfer is in progress
- ⚠ partial — some files transferred, some failed
- ✗ failed — all transfers failed
Getting Started
- Start Exaplay on all PCs. Ensure they are on the same network.
- On the master PC, enable Multi-Client Mode in Settings → Communication if the NETWORK tab is not already visible.
- Remote instances appear automatically under Systems (auto-discovery).
- Select a remote system and toggle the Role checkbox to designate it as a client. Optionally set a Name for easy identification.
- Click Copy Files to transfer media and the project to all clients.
- Configure playback sync as described below.
Step 1: Remote Display Discovery
The master PC automatically discovers all remote Exaplay instances on the network. Their displays appear in the OUTPUTS tab alongside local outputs:
- Sidebar: Remote outputs are grouped by host under a "Remote Outputs" section.
- Layout Map: Remote displays appear with a dashed purple border and a "remote" badge.
- Screen Assignment: Remote displays can be assigned to screens just like local ones.
Discovery happens automatically over the local network; remotes appear within a few seconds of being powered on.
Step 2: Remote Display Assignment
In the OUTPUTS → Screens & Fields section, displays — local or remote — can be assigned to screens the same way. Each engine manages its own displays in the background while the master UI presents a unified view.
A display can be bound either to a specific output on a remote machine, or to the machine itself by position + size (the Machine (use position + size) option in the Bind to… drop-down). Machine binding is handy when you want to place a render region on a client without pinning it to a particular monitor. See Output Setup → Displays.
Cross-machine panorama
Assign displays from different machines to one screen and Exaplay composites them into a single continuous surface — for example a panorama driven by two PCs. Each display's Position is a coordinate on its own machine's desktop; across machines the displays are arranged automatically left → right by machine (master first, then each client), so a master display and a client display read as one wide screen with playback kept in sync. In the Outputs overview each machine appears in its own host-labelled lane. See Output Setup → Coordinates are per-machine.
Step 3: Playback Synchronisation
Enable Playback Sync in the NETWORK tab to broadcast transport commands to all connected clients:
| Command | Description |
|---|---|
| Play | All sync targets start playback |
| Pause | All sync targets pause |
| Stop | All sync targets stop |
| Seek | All sync targets jump to the specified time position |
Configuration
- Enable/Disable: Toggle the "Playback Sync" button in the Network tab.
- Target Selection: Use the per-client checkboxes to include or exclude specific clients from sync.
- Sync settings persist across sessions automatically.
Frame-Accurate Sync
With Playback Sync on, the master continuously measures network latency to each client and compensates for it when starting playback. Each sync target in the NETWORK tab shows a quality badge:
| Quality | Indicator |
|---|---|
| in-sync — within one frame | 🟢 ● |
| soft-drift — a few frames behind | 🟡 ◐ |
| hard-drift — noticeable lag | 🟠 ○ |
| lost — client unreachable | 🔴 ✗ |
Composition and Cue Sync
When the master switches composition or triggers a cue in a Playlist, the change is broadcast to all sync targets automatically so they follow along.
Version Mismatch Detection
The NETWORK tab automatically detects when client PCs are running a different version of Exaplay than the master. Version mismatches are shown with coloured badges:
| Severity | Meaning | Badge |
|---|---|---|
| Major | Different major version (e.g. v3.x vs v2.x) — may be incompatible | 🔴 ⚠ version |
| Minor | Different minor version (e.g. v3.2 vs v3.1) — features may differ | 🟡 ⚠ version |
| Patch | Same major.minor, different patch — safe | 🟢 (no warning) |
Version mismatch badges appear on both system cards and in the inspector panel's Version field.
Remote Health Monitoring
The master periodically polls each online remote for performance data (FPS). Health is classified and shown on system cards:
| Status | Criteria | Indicator |
|---|---|---|
| Healthy | FPS ≥ 90% of target (22.5+ at 25 fps) | 🟢 ● 25 fps |
| Degraded | FPS 50–90% of target | 🟡 ◐ 18 fps |
| Critical | FPS < 50% of target | 🔴 ✗ 8 fps |
The inspector panel shows FPS and status label when a remote is selected.
Restart All Clients
The Restart All button in the Active Sync banner reloads the project on every online client. Use it after making changes to the project on the master. Only client-mode systems are affected; standalone remotes are left alone.
Step 4: File Synchronisation (Active Sync)
The NETWORK tab provides two file sync modes:
Manual Copy
Click Copy Files to transfer the sync folder and current project to every online client. Per-file progress bars show transfer status, large files are chunked and retried automatically if the network hiccups, and each client loads the new project automatically once the transfer completes.
Note: Client PCs receive the project from the master during Copy Files and load it automatically. They do not need their own
.vppfile.
Smart Sync
By default Copy Files sends every media file to every client. In large installations most clients only drive a few screens and never play most of the media, so this wastes bandwidth and disk.
Enable Smart Sync (checkbox under the Sync Folder field) to copy each client only the media its assigned screens actually render:
- The master resolves which screen each clip outputs to (via its composition's screen field) and intersects that with each client's screen assignments (the output-list
owner/ split-cell owners). - Clips reached only through a playlist or a cue/action still travel with the screen they play on, so nothing a client needs is left behind.
- Small assets that aren't screen-specific — VIOSO calibration (
.vwf) files and panel/background images — are always copied to every client. - Safe fallback: if a client's screen assignments can't be determined, or the master can't compute the screen→media map, that client receives the full set of files — Smart Sync never under-copies.
Tip: Assign each client's displays to their screens before running Copy Files so Smart Sync knows what each client needs. With Smart Sync off, behaviour is unchanged (all files to all clients).
Active Sync (Auto)
Enable Auto to automatically push sync folder metadata every 10 seconds:
- The master sends the folder path, file list, and timestamp to each remote.
- Remotes can use this information to stay in sync with the master's content.
- Status indicators show "✓ N files" or "✗ error" per remote.
Sync Folder
Configure the sync folder path in the text input. The default is $[exaplay]/sync.
Network Requirements
| Port | Purpose |
|---|---|
| 8123 | Engine and file transfer |
| 3001 | Effects controls |
| 45454 | Auto-discovery between Exaplay instances |
Ensure Windows Firewall allows all three ports on all machines. See Firewall Configuration for details.
Troubleshooting
Remote not appearing in Systems list
- Verify both PCs are on the same network subnet.
- Check that the Exaplay Engine is running on the remote PC.
- Ensure UDP port 45454 is not blocked by firewall — this is required for auto-discovery.
- Ensure TCP port 8123 is not blocked by firewall — this is required for HTTP communication.
- Verify that broadcast packets are not blocked by your network switch or router (some managed switches disable UDP broadcast by default).
- Click the refresh button in the Systems panel.
Playback sync commands not received
- Verify the remote shows as "UP" in the Systems panel.
- Check that Playback Sync is enabled (toggle button shows "On").
- Ensure the target client's checkbox is checked.
File copy fails
- Verify the sync folder exists on the master PC.
- Check that the remote engine's WebSocket port (8123) is accessible.
- Monitor the per-file progress bars for error indicators (✗).