
Appearance
Visual Effects
Exaplay 3 includes a set of live effects for colour, luminance, and creative image processing — all run on the GPU so they can be adjusted while you preview the result.
Colour Correction (always available)
Every clip carries its own Color Correction section in the Inspector, laid out the way image editors do it. It is not one of the effects below: it is a separate stage that composes with whatever effect the clip has, so correcting a clip's colour never costs you the effect slot.
| Control | Range | What it does |
|---|---|---|
| Brightness | −100…100 % (0) | Lifts or lowers every level. ±100 shifts the whole picture by half its range. |
| Contrast | 0…200 % (100) | Stretches (>100) or flattens (<100) the levels about mid-grey. |
| Saturation | 0…200 % (100) | 0 is monochrome, 200 doubles the colour. |
| Temperature | 2000…12000 K (6500) | The colour of the clip's white. Lower is warmer (amber), higher is cooler (blue); 6500 K is untouched. This is a real white balance — a multiplicative move toward the target white, so black stays black and neutrals stay neutral — not a tint laid over the picture. |
| Tint | −100…100 % (0) | The green (−) / magenta (+) axis perpendicular to Temperature, for a projector or camera that runs green. |
| Red / Green / Blue | 0…200 % (100) | Gain on that channel alone. Pull Green down to take the cast out of a projector that runs green. |
| Master | 0…200 % (100) | Gain on all three at once. Matches a clip's overall level to the rest of the wall. |
Brightness, Contrast, Saturation and the white balance are applied first, in that order, on the clip's own picture; the effect (if any) runs on the result; the R/G/B/Master gains are the last stage.
Typical use is matching: one projector or LED tile that does not sit with the others, or a clip graded on a different system than the rest of the show. Set the neighbouring clips to 100 % and trim the odd one out until they agree.
Master is not Opacity
Both make the picture darker, and they are not interchangeable. Master scales the colour, so the clip stays fully solid and simply renders dimmer. Opacity makes the clip transparent, so whatever sits behind it shows through. For matching brightness across a wall you want Master.
Colour correction is:
- Per clip, saved with the show and applied everywhere that clip plays.
- Live — it lands on the next rendered frame, no reload.
- On every media type: video, stills, Hap, NotchLC, NDI and other live inputs, generative sources and text.
- Synced across a multi-client fleet like any other Inspector value, as long as the clients are on the same show.
- Drivable from outside: the four values are ordinary inspector properties, so show control can ride them (
comp_main.media3.set:colorcorrect.red=80over TCP, the same over OSC/UDP or a cue script), and a Data Track with an Exaplay value output can animate one along the timeline.
Two legacy effects are named for what they do now
Warm / Cool Tint (color_temperature) is an additive red/blue offset — it tints black as much as white, which is why it never read as a temperature — and S-Curve Contrast (color_curves) is one strength value toward a fixed curve, with no curve to edit. Both stay so saved shows keep rendering; for a white balance use Temperature above, and for a curve-shaped contrast use Contrast or the Levels / Shadows & Highlights effects.
Available Effects
46 effects in 10 categories. The picker groups them under these headings; the full parameter list for every one is in the Effects Reference.
| Category | Effects |
|---|---|
| Keying | Color key (with spill suppression), luminance key |
| Tone & Exposure | Levels, brightness/contrast, exposure, gamma, colour balance, shadows & highlights |
| Color Management | Black & white, sepia, invert, hue/saturation, warm/cool tint (legacy) |
| Color Grading | Add colour, multiply colour, vibrance, S-curve contrast (legacy) |
| Blur & Sharpening | Blur, sharpen, motion blur |
| Artistic Effects | Pixelate, edge, oil painting, toon, kaleidoscope |
| Stylize | Chromatic aberration, vignette, posterize, halftone, scanlines |
| Distortion & Projection | Dome, fisheye 180° dome, flat-to-grid, rectangle-to-dome, plane-to-fisheye, lens distortion, camera intrinsics |
| LED & Virtual Production | Moiré reduction, black lift, pixel grid, gamut limiter, eye adaptation |
Color keying
Remove a specific colour from a layer (e.g. green screen). The key colour is three separate 0–1 channel values (key_r, key_g, key_b — green by default), with tolerance, edge softness, luma tolerance and spill suppression alongside. Full parameter reference: Effects Reference → Keying.
Tone and colour
Non-destructive brightness, contrast, gamma and levels correction, plus per-range colour balance. Full parameter reference: Effects Reference → Tone & Exposure.
Applying Effects
Via the Inspector
- Select a clip in the Timeline.
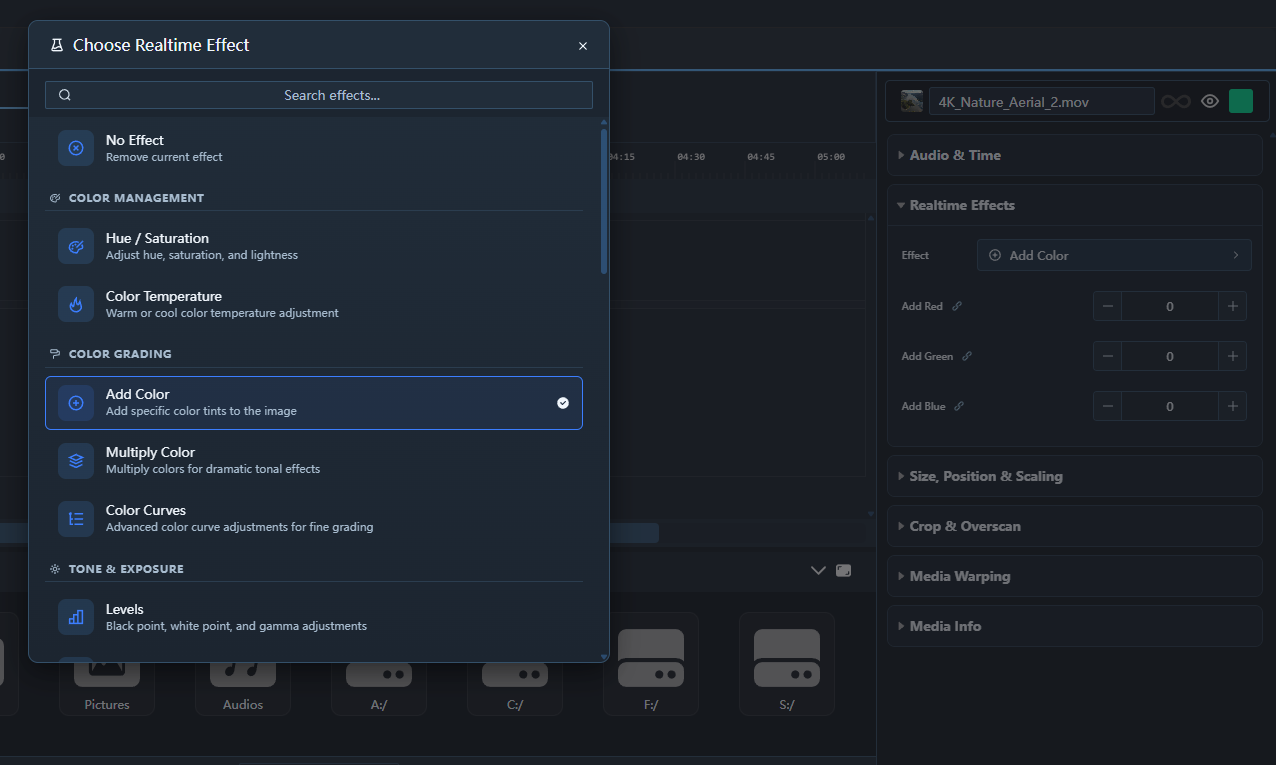
- In the Inspector, open the Effects section and click Add effect (Change once the clip has one).
- A gallery opens in place: every card shows the effect applied to this clip's own picture, and animates while you hover it. Search narrows the gallery by name, description, category or author.
- Click a card. The section now shows the effect's name, a live preview on the clip's picture, and one slider per parameter — drag it, or type an exact value into the box beside it.
The section looks and works like a generator's: an effect changes the clip it sits on, a generator is a clip, and both are tuned the same way. The ↺ button resets the effect's parameters to its defaults.
By drag and drop
The Media Browser has an Effects tab next to Generators. It opens on six folders — Color & Tone, Blur & Sharpen, Stylize, Keying, Projection & 360°, and LED & Virtual Production. Click one to see its effects; the bar at the bottom works as it does for your media — the path shows where you are, the folder button goes back, the search looks through every folder at once, and the zoom slider sets the card size. Each card shows a picture, an arrow, and what the effect turns it into, so you can see what it does before you use it. On a keying card, the checkerboard is what the key removes. For a projection effect (dome, fisheye, 360° window, lens) the picture on the left is the kind it expects — follow the four coloured markers to see where each part lands. Where you drop decides what happens:
- A generator dropped on a track becomes a new clip.
- An effect held over a clip outlines that clip and says what releasing will do: Apply Blur to “Intro”, or Replace Vignette with Blur on “Logo” when the clip already has one (a clip carries one effect). Release to apply it; then tune it in the Inspector as above.
- An effect held over an empty part of a track says Drop … onto a clip — released there, nothing happens.
- An audio clip has no picture, so it takes no effect.
Double-clicking an effect card applies it to the clip shown in the Inspector.
What the preview shows
The preview runs the effect's own shader on the clip's thumbnail, so it shows what the effect does to this picture. It is not the output: the clip's position, crop, warping and colour correction are not applied to it. A track's default effect previews on a test pattern, since a track has no picture of its own.
One effect per clip
A clip carries one effect at a time — the picker is a choice, not a stack. Selecting a different effect replaces the current one. Effect chaining is in development; earlier versions of this page described a "+ Effect" button and stacking that do not exist.
The everyday colour match no longer costs you the slot — that lives in Colour Correction above, which runs alongside whatever effect is selected. The limit still applies to the effects themselves: two of them on one clip is not possible.
Effect Performance
Effects run on the GPU and add negligible overhead.
Removing Effects
- Click ✕ in the Effects section's header. The section then offers Add effect again.
Projection effects: orientation corrected
Five projection effects drew the picture the wrong way up or mirrored: Equirectangular 2:1 to Dome showed the ground at the zenith, Equirectangular 2:1 to Flat showed 360° footage upside down, Fisheye 180 to Dome mirrored the image top to bottom, and Rectangular Screen to Dome and Dome Flat to Grid placed the screen upside down. All five now follow the dome convention: zenith in the centre, the front at the bottom, left on the left. If a show worked around this (for example by flipping a clip or rotating the dome), remove that workaround.
The four dome fills are generators now
Dome Hyperspace Tunnel, Dome Aurora Nebula, Dome Fluid Flow and Dome Fire Sphere used to be effects, but they never used the clip's picture — they replaced it. They are now in the Generators tab (category Dome), where you drag them onto a track like any other generator. A show that already uses one as an effect keeps playing it; the Inspector notes where it lives now.