
Appearance
Inspector Panel
The Inspector panel displays and edits the properties of whatever is currently selected — a clip on the timeline, a screen output, or a cue.
Opening the Inspector
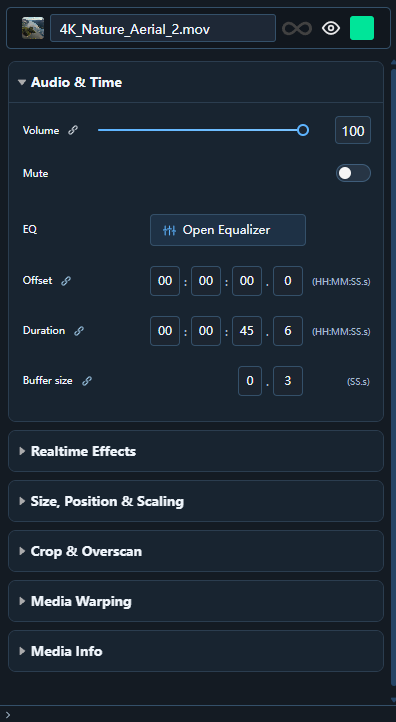
The Inspector is always visible on the right side of the Main Editor. Click any item in the composition canvas or timeline to populate it. As of 3.3, each property group renders as a collapsible card rather than a flat table — the properties themselves are unchanged, only the layout and the input widgets below are new.
Inspector Redesign (3.3)
Card Sections
Each property group (Media, Layer, Screen, Effects, …) is its own card with a ▸ header to expand or collapse it. A collapse-all control sits in the panel's footer to tidy the whole Inspector at once.
Segmented Timecode Inputs
Time-based fields (e.g. clip Start/End, buffer size) use a segmented Hours:Minutes:Seconds.Tenths entry — each segment can be typed into directly, stepped with the up/down controls, or navigated with the keyboard.
Drag-Scrub
Numeric and fader inputs can be adjusted by clicking and dragging vertically on the field, in addition to typing a value or using the step buttons.
Crop Editor
A visual crop/overscan editor: drag the corner handles directly on a preview of the source to crop into the image or push the frame out past its edges (overscan), instead of typing raw offset numbers.
The editor has two modes, switched at the top of the preview:
- Window — the crop is a rectangle. Its four handles resize it, dragging the box moves it, and the fields below give the window's size and its edge offsets.
- Corners — each of the four corner points moves on its own, for a skewed or keystone-shaped crop (a picture behind a slanted wall edge, a source with a tilted frame). The visible region becomes the quadrilateral drawn in the preview; what the corners cut away is shaded. The picture itself does not move or distort — this is a mask, not a perspective correction (use Media Warping for that). Every corner can also be typed as its exact source-pixel coordinates in the TL / TR / BL / BR fields, laid out like the picture, in px or as a percentage of the source size — a projection setup is measured, not eyeballed. A corner can only be pulled inside the window, never outside it. Reset corners puts all four back on the window without touching the window itself; the section's Reset clears everything.
Save Preset
An inline Save Preset button sits next to preset-name fields so you can save the current settings as a new preset without leaving the Inspector.
Appearance
The Inspector follows the app-wide colour theme (Default, Black, or Light) set in Menu → Settings → Interface; see Configuration → Interface and Workflow Options.
Sections
Clip selected
| Property | Description |
|---|---|
| Name | Display name of the clip, in the panel's title row |
| ID / Colour / Visibility / Loop | The inline row under the title — the clip's show-control ID, its colour on the timeline, its visibility switch and its loop toggle |
| File | The clip's file path, with Copy and Replace… — see Media |
| In / Out | In and out points within the source file, next to Offset (position on the timeline) and Duration — see Trimming |
| Volume | Audio level, 0–100 %, with a Mute switch |
| Fade | One Fade type — Use default / None / Crossfade / Fade to black — with In, Out and Length in seconds. See Fades & Transitions |
| Size, Position & Scaling | Scaling mode, orientation, size, offset and alignment, in pixels or % |
| Crop | The visual crop / overscan editor described above |
| Effects | One GPU effect with its parameters — see Visual Effects |
| Colour Correction | Red / Green / Blue / Master gain (0–200 %) plus brightness, contrast, saturation and white balance — always available, independent of the effect (details) |
| Media Warping | Per-clip warp grid |
| Buffer size | Decode buffer in seconds |
Loop Count (playlist clip selected)
A clip in a playlist has a Loop card of its own:
| Property | Description |
|---|---|
| Loop Count | How many times the clip repeats. 0 = infinite (the ↻ button resets to it); 1–99 for a fixed count. |
| After Loop | What happens once the count is used up — Continue Playlist, Black, or Last Frame. Only shown for a finite count. |
| Fade In / Fade Out | A fade applied at each loop boundary, 0–10 s. |
Screen or field selected
Screens and fields are edited on the Stage tab, which has its own inspector — see Output Setup. A screen's own Inspector card in the Main Editor carries its ID, colour, mute and Screen Warping grid.
No blend modes or Z-order fields
There are no per-clip blend modes (Add / Multiply / Screen) and no bring-to-front / send-to-back buttons in the Inspector. Draw order comes from the position of the screen, composition and track in the project tree: reorder the tracks, or the compositions, to change what covers what.
Collapsible Sections
Each property group has a ▸ toggle. Collapse sections you don't need to keep the panel tidy.