
Appearance
Inputs — Touch, Sensors, Controllers & Tracking
Inputs connects anything that comes in to what happens on the wall: a touch screen, a lidar scanner, a button box, a MIDI fader, a presence sensor, a stage-tracking system, a microphone. A touch starts a cue, a person walking across the room moves a clip, a fader drives an opacity.
Inputs is a tab of the Control view: Control → Inputs. Or select a clip and press Input… in the Inspector's title row, then choose Clip follows, Fade with position or Volume with position. Inputs opens on that template with the clip already chosen.
It is one tree, in the order the data flows: devices (where the input comes from), their channels, and the rules that read each channel (what happens). The two parts of this page follow it: Devices and What happens.
To see it done once, open ☰ menu → Walkthroughs → Inputs & show control:
- Inputs — touch, sensors and controllers: a touch starting a cue and a person walking moving a clip, step by step.
- A clip that reacts to a visitor: the Inspector's Input… making a clip fade, follow or get louder.
Devices and rules are stored in the project (
.vpp); the built-in inputs' switches belong to this PC (see Built-in inputs). Hover a ? sign for details.
Devices
Every input becomes one or more channels, such as touch1, radar2, nx001 or mic. A channel carries an X and a Y, usually 0…1 across the tracked area, with Y growing downward (0 is the top). Depending on the device it also carries a Z (height), an Angle (rotation or heading), and clicks (press and release). The mappings under What happens read these channels.
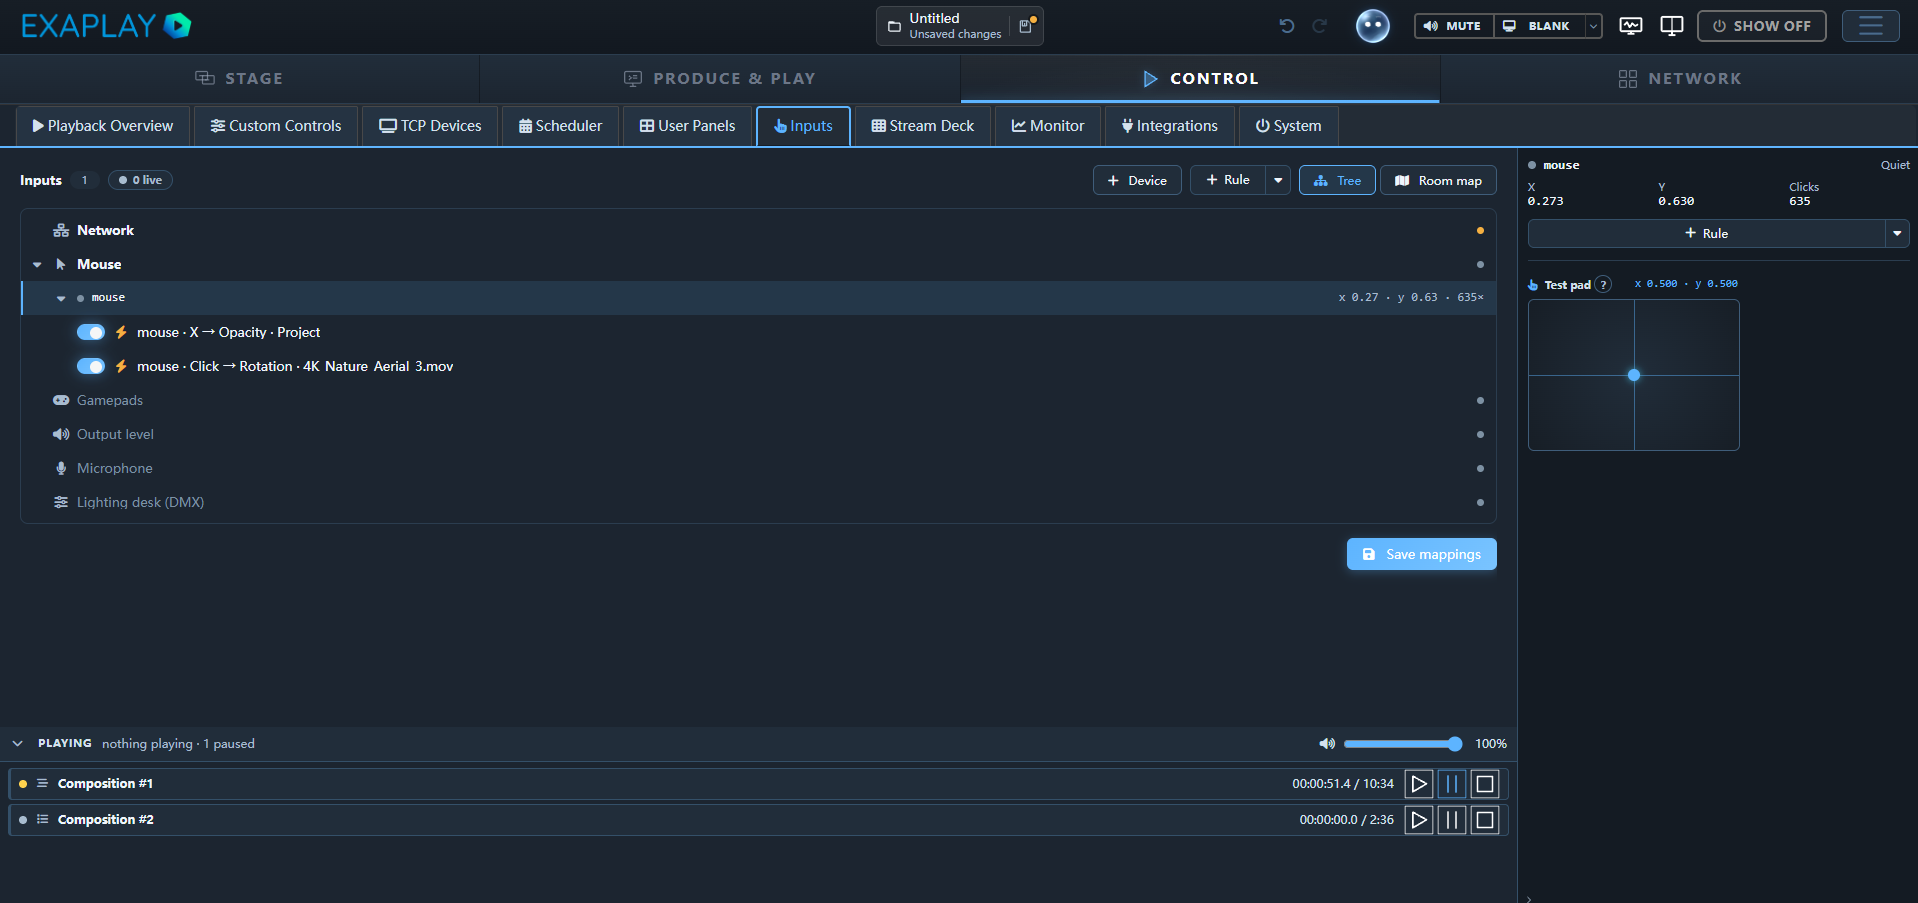
Inputs is one tree, in the order the data flows: each device (the built-in inputs, and the devices added to the project) lists the channels it delivers, and each channel lists the rules that read it. Click a device to open its settings. Its dot shows the engine's report; hover it for the word (Receiving, Waiting for data, Off …). A problem is written out.
What you click opens in the Inspector on the right. With the Inspector hidden it opens in a column beside the tree instead — the same thing, one place at a time.
Built-in inputs
| Device | What it is | Channel |
|---|---|---|
| Network | Anything your own software sends. Always on (see Sending from your own software) | the name you send |
| Mouse | The mouse of the engine PC: its position across all screens or one display, the left button as a click | mouse |
| Gamepads | Up to four game controllers (XInput): the left stick as X / Y, the A button as a click | joy1 … joy4 |
| Output level | The level of Exaplay's own audio output, as X | audio |
| Microphone | A microphone or line input of the engine PC, as a level 0…1 | mic |
| Lighting desk (DMX) | A lighting console over Art-Net or sACN. Its row shows how many DMX mappings the show has; Edit mappings… opens them, Receiver settings… opens Settings → Communication, where this machine's receivers are switched on. See Art-Net DMX input | — (DMX mappings, not channels) |
Switch a built-in input on with its On switch (the lighting desk has none: its receivers are switched in Settings → Communication). Its dot then reads Waiting for data, and turns green (Receiving) as soon as values arrive. The switch is saved at once — on this PC, not in the show: the mouse, gamepads, output level, microphone and the mouse's area belong to the machine, so another PC that opens the same show keeps its own. A show saved by an older Exaplay still carries these switches; they apply until you change one on this PC.
Mouse: choose the screen it plays on under Area. All screens gives X / Y across the whole Windows desktop. On a rig with a control monitor and one output (an NVIDIA Mosaic counts as one screen), click Output only, or choose the output under Area. X / Y then run 0…1 across that output, so a mapping onto a generator's Pointer X / Y needs no range of its own. A click on the control monitor is not a click, so working in Exaplay never fires a shot in a dome game. The list shows the screens of the engine PC.
Microphone: choose the input under Input (Default input follows Windows). The list shows the inputs of the engine PC, not of the computer you are browsing from. The level is measured from −60 dB (0) to 0 dB (1). It rises fast and falls slowly, so a "rises above" trigger fires once per clap and does not flicker. If the chosen input is unplugged, the panel says so, and Exaplay reconnects on its own when it comes back.
Add device
+ Device opens a gallery with one card per product. Several products work the same way: OptiTrack, Vicon and ART, for example, are all added as a motion tracker. Each protocol also has a general card for products that are not named. Click a card to add the device. It is saved in the project at once, and the engine starts it within about a second.
| Card | Protocol | Default | Channels |
|---|---|---|---|
| Touch screen (touch frames, foils, multi-touch screens) | TUIO | UDP 3333 | touch1, touch2 … (one per finger) |
| RadarTouch (and other lidar / radar scanners) | TUIO | UDP 3333 | radar1, radar2 … |
| Object table (printed markers seen by a camera, through reacTIVision) | TUIO | UDP 3333 | table-obj12 for marker 12, its rotation as Angle; putting it down or lifting it is a click |
| OptiTrack, Vicon, ART, Motion tracker | VRPN | server port 3883 | body1, body2 … (X / Y on the floor, Z the height, Angle the heading) |
| zactrack, BlackTrax, Stage tracking | PosiStageNet (PSN) | multicast 236.10.10.10 : 56565 | psn<id>, under the tracking system's own tracker id |
| Mo-Sys, stYpe, Ncam, Camera tracking | FreeD | UDP 40000 | cam1 (position, Angle = pan), cam1-rot (pan, tilt, roll in degrees), cam1-lens (zoom, focus) |
| MIDI controller | MIDI | first input | midicc7 (fader or knob), midinote36 (pad or key: a click, velocity as X), midibend; on another MIDI channel midich2-cc7 |
| Nexmosphere (XperienCe controllers on USB / serial) | X-Script | COM3, 115200 baud | nx001, nx002 … (the sensor's number as X); RFID tags nx-tag1 … (picked up = click, put back = release) |
| Visual Productions (IoCore2, B-Station2, Kiosc, CueCore) | OSC | Exaplay's OSC port | vp1, vp2 … |
| Hand tracking (Ultraleap, through TouchFree) | — | — | moves the mouse, so the channel is mouse |
| Web data (any https address: an API, a text file on a server) | https GET | every 30 s, the whole answer as text | web — a number answer as X, over its range; the text for a Text clip as {src:web} |
| MQTT (Home Assistant, Node-RED, Mosquitto, IoT gateways) | MQTT 3.1.1 | broker port 1883, one topic | mqtt for the first topic, mqtt-2 … for the next — a number message as X, over its range; the text for a Text clip as {src:mqtt} |
A second device of the same kind gets its own name and channel name (RadarTouch 2, channels radar2-1 …; Web data 2, channel web2; MQTT 2, channel mqtt2). A second TUIO or FreeD device gets the next free port.
A device's settings
Clicking a device in the tree opens:
- Name, and what the device needs: Port (TUIO, PSN, FreeD), Tracker and Server (VRPN), COM port (Nexmosphere) or MIDI input (the inputs of the engine PC; First input when none is chosen).
- On, to stop a device without removing it, and the trash button to remove it.
- How to connect …: two or three steps for that product, with this PC's address and the port filled in.
- More…: the Channel name (the start of every channel name, for example
radar); for Nexmosphere the Baud rate; for PSN the Multicast group; for VRPN the Server port. For VRPN, PSN and FreeD it also holds the axes: which tracker axis becomes the channel's X, Y (the floor) and Z (the height), over which metres. The defaults are ±2 m and 0…2.5 m high for VRPN, and a stage of ±5 m and 0…3 m high for PSN and FreeD.
Below the settings, the device shows what the engine reports: Receiving with the rate (for example · 60/s), Waiting for data, Connecting…, Connected, Starting…, Not reported yet, or the problem in plain words (for example that the port is in use). A PSN source also shows who sends it (from zactrack). Each live channel is listed as a chip: click it to add a mapping for that channel.
A device's panel names a mistake before the engine is asked:
| Message | Meaning |
|---|---|
| Give the device a channel name. · Another device uses the same channel name. | Every device needs a channel name of its own. |
| The port must be 1 … 65535. | |
| Another device already listens on port … | Two TUIO or FreeD devices cannot share a port. |
| Port … is Exaplay's own OSC port | TUIO sent to the OSC port already arrives there, as tuio1 …; give the device another port. |
| The PSN group must be a multicast address (224 … 239.x.x.x). | |
| Enter the VRPN server's address. · A VRPN server must be on the local network. | Exaplay connects only to addresses in a private or local network. |
| Enter the controller's COM port, e.g. COM3. · Another device already uses COM… | COM1 … COM256. Windows Device Manager → Ports shows the number. |
| Another device already uses … (MIDI) | A MIDI input can have one user. An input that Timecode uses for MTC is not free either. |
| Enter the address to fetch. · Only https:// addresses are fetched. · Put no user name or password in the address … | Web data: an https address without credentials. |
| Enter the broker's address. · Topic 1: Enter a topic. · # can only be the last level … · A password needs a user name … · Topic 2: another topic already feeds … | MQTT: see MQTT: values from a broker. |
Visual Productions units send OSC by themselves, so the engine has nothing to start. The panel shows what to enter on the unit's own web page: the Out IP (this PC and Exaplay's OSC port, 8000 unless changed), and per input a Show Control task with its address: Send Bool to /exaplay/track/vp1/click for a contact or button, Send Float to /exaplay/track/vp1/x for a 0–10 V input or a fader. Its dot in the tree turns green when the first value arrives.
Hand tracking has three steps: install Ultraleap TouchFree on the engine PC, choose the Air Push interaction, and switch the Mouse input on (the third step is that switch). The hand then moves the Windows pointer, and a push clicks. Its dot reads Waiting for a hand until the mouse channel receives.
Web data: a value from a URL
Web data reads an https address and makes its answer part of the show: a weather or flight API, a visitor counter, a text file on a web server. Its panel has:
- Address — the https address. Only https is fetched, and a user name or password in the address is refused (anyone on the network could read it back).
- Every (s) — how often it is fetched, 1 s … 1 day (default 30 s).
- JSON field — empty takes the whole answer as text. For a JSON answer, name one field:
current.temperature,list[0].name, or the same as a JSON Pointer,/current/temperature. - Shows — what the engine got last, and how long ago. The code next to it, for example
{src:web}, is what a Text clip types to show it. - More… — the Channel name and the Number range: a number answer becomes the channel's X, from = 0 and to = 1 (default 0 … 100).
Where the value goes:
- A Text clip shows it with
{src:<channel>}anywhere in its text, for exampleTemperature: {src:weather} °C. Until the first answer arrives it shows--;{src:weather|n/a}shows n/a instead. See Text Layers. - A generator parameter binds to it: in the parameter's binding row choose Web data… and the channel. The number over its range drives the parameter between the binding's two values. Until a number arrives, the parameter keeps its own value.
- A rule: a number answer is the channel's X, so triggers (rises above, becomes exactly) and value mappings read it like any sensor.
Only the master (or a standalone machine) fetches. It hands every value to its clients, so all machines show the same text at the same time and a client needs no internet. The request is always a plain GET with no extra headers. When a fetch fails, the last value stays on the output and the panel reads Stale — the last try failed, with the reason (The server answered HTTP 503., The server's name is not known (DNS), The answer has no current.wind. …). An answer larger than 64 KB is refused; the value itself is at most 4096 bytes.
MQTT: values from a broker
MQTT subscribes to topics on a message broker and makes every message part of the show — the usual way to hear from a smart building, a home-automation system or IoT sensors. Typical brokers are Home Assistant (its Mosquitto broker add-on), Node-RED (its broker node, or Mosquitto next to it) and Mosquitto itself on any PC of the network. Its panel has:
- Broker and Port — the broker's IP address or host name, port
1883unless the broker says otherwise. The broker must be on the local network (10.x, 172.16–31.x, 192.168.x, or this PC); anything else is refused with that reason. - Topic — one row per topic, up to 16. A topic may use MQTT's wildcards:
+for one level (home/+/temperature),#for everything below (sensors/#). Every message on a matching topic replaces the value — with a wildcard, the newest message of any matching topic wins. - JSON field — empty takes the whole message as text (and as a number, when the whole of it is one, like
21.5). For a JSON message, name one field:temperature,state.brightnessor/state/brightness— the same rules as Web data. - Channel — the first topic feeds the device's own channel (
mqtt), the next onesmqtt-2,mqtt-3…; type a name here (for exampledoor) to give a topic its own. A named channel stays the same when you remove a topic above it. - Number from / to — a number message becomes the channel's X: from = 0 and to = 1 (default 0 … 100).
- Shows — what the engine received last on that topic, and the code (for example
{src:mqtt}) a Text clip types to show it. - + Topic — subscribe to one more topic.
- More… — the Channel name, the broker User and Password, a fixed Client id (empty = Exaplay makes one; two connections with one id throw each other off the broker) and the Keep-alive (5 … 600 s, default 30).
Where the value goes is the same as for Web data: {src:<channel>} in a Text clip, a generator parameter's binding (Web data… lists the MQTT channels too), and — a number — the channel's X for triggers and value mappings. A message on home/door with the payload 1 and a rule door rises above 0.5 → comp1.cue.go=Welcome starts the welcome cue when the door opens.
Good to know:
- Only the master (or a standalone machine) connects to the broker, and it hands every value to its clients like Web data. Actions fire on the master only.
- A retained message (most home-automation states are retained) arrives at once when Exaplay connects, so the value is there before anything changes.
- An empty message carries no value: the last one stays. A message that is not what the JSON field expects leaves the value alone, and the panel names the problem (mqtt: The message is not JSON …).
- When the broker goes away, the values stay and the panel reads Stale — the broker connection broke; Exaplay reconnects on its own every few seconds (every 30 s after a refused login).
- No encryption (TLS) in this version. Exaplay talks plain MQTT over TCP, so a user name and password cross the network in clear — which is why the broker must be local. The password is also saved in the show, and anyone who can reach this machine's web port can read it back. Give Exaplay its own broker account that may only read (and, for
MQTT>cue lines, write) the topics the show needs. - To send to the broker from a cue — switch a light, tell Home Assistant a scene started — use the cue line
MQTT>broker,topic,payload; broker can be this device's name, so its login is used. See Cue Script Reference › MQTT.
Channels and the test pad
Every channel sits under the device it comes from, with its live X and Y on its row; its dot is green while values arrive. Click it to see all its values — Z and Angle too, when the channel carries them — and its Clicks, with + Rule underneath: it works like the + Rule above the tree, with this channel already filled in. A channel that a rule expects but that has not sent yet reads waiting. The badge next to the title counts the live channels.
The test pad (shown when nothing, or a channel, is selected) sends to the channel test: drag to send X / Y, press to send a click, and let go to send the release. Use it to try a mapping without a device.
Sending from your own software
Click Network in the tree to see the endpoints:
| Protocol | Message |
|---|---|
| OSC | /exaplay/track/<channel> <x> [<y>] · /exaplay/track/<channel>/x <v> · /exaplay/track/<channel>/y <v> · /exaplay/track/<channel>/click [<v>] |
| UDP / TCP | track,<channel>,<x>[,<y>] · track,<channel>,x,<v> · track,<channel>,y,<v> · track,<channel>,click[,<v>] |
| HTTP | POST /tracking, see below |
| TUIO | on Exaplay's OSC port as /tuio/… (no /exaplay prefix); cursors appear as channels tuio1 … |
Values in angle brackets are numbers. In the x / y / click forms the word is literal: track,radar3,x,0.4 sets only x. click defaults to 1.
OSC arguments may be float, int, a numeric string, or OSC
T/F. See the OSC API.UDP / TCP reply
OK, orERR,track_expected_channel,ERR,track_expected_value,ERR,track_bad_args.HTTP
POST /tracking(JSON body):- one sample:
{"channel": "radar3", "x": 0.4, "y": 0.7}. Optional:x,y,z,angle, andclick(number ortrue/false). Answers200, or400withoutchannel. - a batch:
{"samples": [{"channel", "x", "y", "z", "angle"}, …], "clicks": [{"channel", "click"}, …]}, at most 64 of each. Answers{"ok": true, "samples": n, "clicks": m}. {"fire": "<mapping>"}fires a mapping;{"command": "group:scene2=on"}switches groups (see below). Both answer{"ok": …, "error": …}.GET /trackingreturns the live channel block.
See the HTTP REST API.
- one sample:
A channel appears in the tree the moment its first value arrives.
What happens
Mappings save on their own a moment after your last change; Saving… at the bottom shows one on its way, and Save mappings saves at once. A template's Create & save saves at once. Each rule has a switch in the tree, and a channel's own + Rule starts one that reads it.
Start from a template
+ Rule adds an empty rule whose sentence you fill in yourself. The arrow ▾ next to it opens Templates, the common cases ready-made. Hover a template for a one-line description. From a channel, both start with that channel.
| Template | What it sets up |
|---|---|
| Clip follows | A clip moves with a person, a hand or an object (X and Y) and stays on the surface it plays on |
| Enter an area → cue | Someone walks into a zone → a cue starts |
| Touch or button → cue | A touch, a pad, a key or a sensor → a cue starts |
| Swipe → cue | A quick move left, right, up or down → a cue starts |
| Object placed → cue | A marker or RFID tag is put down or picked up → a cue starts |
| Fade with position | A clip's opacity follows a position |
| Volume with position | A clip's volume follows a position |
A value template (Clip follows, Fade with position, Volume with position) asks three short questions:
- What moves? Move it now and Exaplay picks the channel that moves, or click a channel. With nothing sending yet, Connect a device… opens the device gallery.
- Which clip? The clips by name, grouped by composition.
- How should it feel? Instant, Smooth or Calm. For a fade or volume, also the direction in the room (Left ↔ right, Front ↔ back, Low ↔ high) and Reverse.
Create & save then adds it as one card that reads like a sentence. Edit reopens the questions (Update & save replaces the card), and Details shows the mappings behind it.
A cue template adds an ordinary mapping card that already has its trigger and Go to Cue filled in. You only choose the input and the cue.
A mapping is one sentence
Every mapping reads as a sentence of clickable parts, with a switch in front to turn it on or off:
When
cam1 · XthenPosition X · Intro0 … 1720When
touch1click inside an areathenGo to Cue Intro · Main
Click a part to change it. Its editor opens under the sentence, one part at a time. At rest, each card is a single line with a live preview of its value on the right.
The input (When)
- Press Learn, then move or press the thing you want to use. Exaplay takes the channel and axis that moved most, or the one that was pressed if the card does something.
- Or click it in the list: every live channel is listed with a small meter per axis.
- A device that is not sending yet can be typed with Type a channel name (next to Learn). The mapping connects as soon as it sends.
What it sets (then → Set a value)
- Pick the value in the list under the sentence. Click your way down: Project › composition › clip. Each element lists its common properties first, marked ★: Position X / Y, Size, Opacity, Volume, Rotation and, on a generator clip, its pointer, its click, its bound variables and its parameters (an effect's parameters too). All properties shows every other one. A crumb at the top goes back up.
- Or type the path in the line above the list (
comp1.media3.audio.volume). As you type, it suggests what can come next. A Custom command under Do something completes the same way. - Choosing a property sets its natural range, for example the pixels of the surface for a position. If Exaplay cannot read that range, the card says so in orange. In that case, enter from … to yourself.
- A generator's Pointer Y and a tracked skeleton's Y joints start inverted (1 … 0): an input's Y grows downward, theirs grows upward, so a raised hand raises the pointer. Press Invert to undo it. Mappings you saved before this stay exactly as they were.
How the input becomes the value (the number part)
- From … to: the input's range is stretched onto two numbers. Invert swaps them, so the value goes down as the input goes up.
- × and +: the value is the input multiplied and then shifted, for example
× 1920 + 200for a position in pixels. - Only one of the two is shown at a time. Switching between them converts the numbers, so the result stays exactly the same.
- Smoothing: Off, Light, Medium, Strong, or Custom… (0 = instant … 0.95 = very calm). Calmer is also slower.
What it does (then → Do something)
- Go to Cue is the default. When the project has one composition, it is already chosen, so you only pick the cue.
- Next cue / Previous cue, for a button that just advances. In a playlist this is the next or previous item. In a timeline it is the next or previous cue marker: the playhead jumps there and the cue runs, exactly like Go to Cue.
- Play, Pause, Stop, or Custom command… (any command line, for example
comp1.cue.go=2). - Test runs the action once without the input. It saves the mappings first if something changed, and shows what the engine answered (Fired: …, or why not). On a multi-client client, Test is refused: actions fire on the master, so test there.
⋯ More holds what most mappings never need: the Group and the Input range. The input range is the part of the input that is stretched onto the value (0 … 1 by default). Narrow it to use only part of the area, or widen it for a device that sends its own numbers, such as a Nexmosphere sensor or a FreeD lens.
When it fires
An action fires on its Trigger on:
| Trigger | Fires when … | Named choices |
|---|---|---|
| Click / touch | on every press. With Only inside an area, a press counts only where it lands inside the area | Area: Centre, Left third, Right third, Top third, Bottom third, Anywhere, Custom area… |
| Double tap | a second press follows the first in time (optionally inside an area). A triple tap fires once | Tap speed: Quick, Normal, Relaxed |
| Value crosses a level | X, Y, Z (height) or Angle (rotation) rises above, falls below or becomes exactly a value. Fires once, and again only after it has crossed back | the value |
| Swipe along one axis | the value goes from one side to the other in time. A slow drift does nothing | Swipe right / left / down / up; Speed: Fast, Normal, Relaxed |
| Moves in a direction | the position travels a distance in a direction, in time | → Right, ↗ Up-right …; Distance: Short, Medium, Long |
| Stays in an area | the position stays in an area for a time, or as soon as it enters. Leave the area to arm it again | the area as above; As soon as it enters, ½ second … 3 seconds |
For every trigger, Cooldown (Off, ½ second … 5 seconds) holds back a fire that comes too soon after the previous one. For a swipe, a direction and an area, Only while pressed counts the movement only while the channel's click is held: a finger on a touch surface, or the mouse button. That tells a real swipe from a hand merely passing by. It needs a sender that also reports the release (TUIO, the mouse, gamepads and the test pad do).
Each name stands for a few numbers. Adjust values… shows them, with a pad that draws the swipe, the direction or the area; drag on it to change them. A number that no name fits reads Custom…, and the numbers stay open. Values are 0 … 1 across the tracked area, with Y growing downward.
Learn on a swipe, a direction or an area records the movement once: press it, make the movement, and the values are taken from it (Learned: …). For an area, hold still where it should be.
While the show runs, the card shows what the engine reports: how often the mapping fired and when last (Fired 3× · 2.1 s ago, … held back by cooldown), a Fired! flash, and the trigger's state: armed — now swipe, holding 40 %, tap again, moving. A card the engine has not reported yet shows nothing.
Room map
Switch from Tree to Room map to see every live channel as a dot on the floor plan, and every Stays in an area mapping as a rectangle. Draw a rectangle to create an Enter an area → cue rule for it. Drag a zone to move it, or a corner to resize it, then save. A zone lights up while its channel is inside it.
Groups — switching mappings during the show
Give mappings a Group (under ⋯ More) to switch whole sets on and off. A mapping without a group is always active. The groups appear as chips above the tree, each with its live state from the engine. Click a chip to switch the group now, and tick Starts off for a group that should be off when the project loads (saved on its own, like every rule change). The copy button next to a chip copies its cue-script line.
A cue script switches groups with TRACKING>:
TRACKING>group:scene2=on      (=off, =toggle)
TRACKING>solo=scene2          that group on, every other group off
TRACKING>all=on (=off)From outside Exaplay, send POST /tracking with {"command": "group:scene2=on"}. The TRACKING> lines are not accepted over TCP or UDP.
Group switches are live state and are not saved. After a project load, every group starts as set under starts off.
In a multi-client show
Actions fire on the master only. A mapping that does something (a cue, play, a command) runs on the master, or on a standalone machine, and never on a client, so a sensor that reaches several machines fires it once. The master's playback reaches the clients through the normal sync. On a client, Inputs says so in one line, and its rules show no fire count.
A client still receives its inputs: it starts the devices of the show it has loaded, and its channels appear in the tree, which is how you check that a machine is receiving. A client also still applies value mappings (a clip following a tracker) to its own outputs, from whatever reaches it. A value is the same on every machine that receives the same input, so nothing is doubled.
Point your devices and your own software at the master. A PosiStageNet source is multicast, so it reaches every machine on its network. For a value mapping to move content on a client's outputs, that client must receive the input too, for example through PosiStageNet or a sender that sends to every machine.
Tips
- Nothing arrives? The device's dot in the tree (hover it) and its panel say what the engine sees. Waiting for data means Exaplay is listening but nothing has come in yet: check the target IP and port in the device's own software.
- Values jump? Raise Smoothing on the card.
- Upside down? An input's Y grows downward, while a generator's Pointer Y and a tracked skeleton's joints grow upward. A new mapping onto one of those starts inverted. A mapping saved before that, or one onto another upward value, needs Invert pressed once.
- A zone should react only to one person? Use that person's channel as the card's input.
- Mappings bind by name. A card set up for
radar3starts working the moment that channel appears, even mid-show. - The Monitor's event log lists every fire and every Test (protocol Tracking). A failed action is an error row.