
Appearance
Installation
This guide walks you through downloading, installing, and activating Exaplay 3 on a Windows PC. By the end, you will have the application running and ready for the Quick Start Tutorial.
What You'll Need
- A Windows 10 or 11 PC (64-bit) — see System Requirements for full specs
- Administrator access to install software
- An internet connection (for downloading and license activation)
- Your Exaplay 3 license key (provided by your reseller or via email)
Step 1 — Download the Installer
Download the current installer from vioso.info/download-exaplay — that link always serves the newest release — or browse all versions on the official release page. For an earlier version, the changelog links the newest installer of each release line; those direct links follow the scheme https://download.vioso.com/releases/exaplay/Exaplay3_<MAJOR.MINOR.PATCH>.exe.

The installer is a single executable file, approximately 150 MB. No separate downloads are needed — all prerequisites are bundled.
Step 2 — Run the Installer
- Double-click the downloaded installer (e.g.
Exaplay3_3.5.0.exe). - Windows may show a User Account Control (UAC) prompt — click Yes to allow the installation.
- Follow the on-screen wizard: accept the licence agreement, keep or change the installation folder (default
C:\Program Files\Exaplay 3\), and leave Create desktop icons ticked if you want a Desktop shortcut.
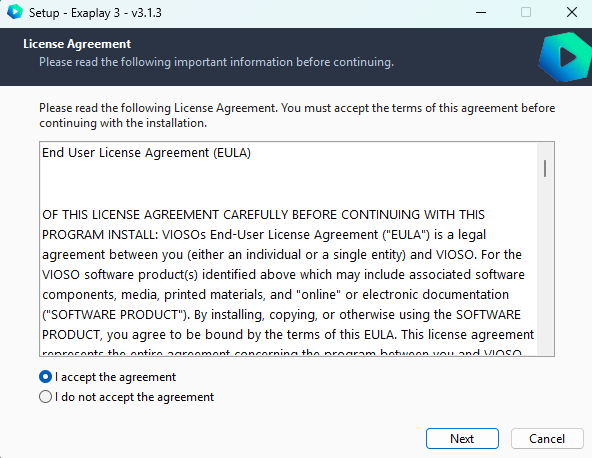
The installer also installs the Microsoft Visual C++ Redistributable (x64), which Exaplay 3 needs to run, and adds Windows Firewall rules for Exaplay 3 and the Exaplay 3 Service so other machines and control systems can reach it on the network.
What gets installed?
- Application files →
C:\Program Files\Exaplay 3\ .vppfile association → Double-clicking a.vppproject file opens it in Exaplay 3- A Start Menu folder Exaplay 3 (Exaplay 3, Exaplay 3 Service, Uninstall Exaplay 3) and, if selected, a Desktop shortcut
- The Exaplay 3 Service — the watchdog that monitors the engine for crash recovery. It runs as a background program with its own tray icon (not as a Windows service) and is started automatically when you log in to Windows
Step 3 — Launch Exaplay 3
Start the application from the Desktop shortcut or the Start Menu.
On first launch, Exaplay 3 will:
- Create a working directory at
Documents\Exaplay3\(in your Windows Documents folder) with aprojectsfolder for your project files, plus the settings (config), logs (logs) and auto-heal data. - Start the Exaplay 3 Service (the watchdog) if it is not already running. It monitors the engine and can automatically resume playback after a crash.
- Open the web-based editor. By default it opens in your default web browser; to open it as its own app window instead, choose ☰ → Settings → Startup → Open the interface → As an app window.
You will see the Exaplay 3 icon  in the Windows system tray. Right-click it for Launch Exaplay UI, Send Exaplay output to background, Toggle Show Mode, Video Mute, Audio Mute, Screen guidelines, Play / Pause / Stop all compositions, Restart Exaplay and Close Exaplay.
First-Run Welcome Screen
The first time the editor is opened in a browser, a Welcome to Exaplay 3 screen appears. Click Explore tutorials to open the built-in tutorials, or Get started to go straight to the editor.
Reopen it later
You can reopen the welcome screen at any time from ☰ → Settings → Interface → Show Welcome Screen, the tutorials from ☰ → Tutorials, and the recorded step-by-step walkthroughs from ☰ → Walkthroughs.
Step 4 — Activate Your License
Exaplay 3 uses the Soraco QLM licensing system.
- Without a valid license, the editor shows an Activate Exaplay 3 screen. Click Activate license. No license yet? Click Request a free demo below it, and the key comes by email. With the editor open, the same dialog is at ☰ → License.
- Enter the license key from your purchase email. It does not matter whether you type it with or without dashes, or in lower case: the field groups it into blocks of four as you type.
- Click Activate. When it is done, the dialog says You're all set! and shows your license. Click Get started.
Activation needs an internet connection on this PC. If it has none, click No internet on this PC? Activate offline below the key. If Exaplay already knows that the license server cannot be reached, the button itself reads Continue offline. Then:
- Scan the QR code with your phone, or open the link on any device with internet (Copy link).
- Confirm the activation in the VIOSO license portal.
- Enter the response code the portal shows, and click Activate.
Verify activation
Open ☰ → License. The card shows your license key, Active, and the date until which updates and support are included. A demo license shows how many days are left, and a DEMO badge in the header.
Move a license to another PC
A license is activated on one PC at a time. To move it, release it on the old PC first:
- Open ☰ → License and click Deactivate on this PC….
- Click Deactivate. If the PC has no internet, click No internet on this PC? Deactivate offline and follow the same three steps as above.
- The dialog shows License released with your license key. Click Copy key and keep it. You enter it on the new PC.
Exaplay stops working on the old PC until a license is activated there again. Projects and media are not touched.
Step 5 — Verify the Installation
Before moving on, confirm everything is working:
- [ ] The Exaplay 3 icon appears in the system tray
- [ ] The web UI opens and shows an empty project
- [ ] The tray icon right-click menu is accessible
- [ ] ☰ → License shows your license as Active
If any of these checks fail, see Troubleshooting → Crashes & Recovery for common first-launch issues.
Uninstalling
Use Windows Settings → Apps → Exaplay 3 → Uninstall, or Start Menu → Exaplay 3 → Uninstall Exaplay 3.
WARNING
The working directory (Documents\Exaplay3\) is preserved during uninstall so you don't lose projects. Delete it manually if you want a completely clean removal.
Advanced: Command-Line Flags
When launching the executable from a command prompt or shortcut, you can pass optional flags to customise startup behaviour:
| Flag | Description |
|---|---|
-fresh | Safe mode: start with an empty project — skips the startup project, the last-project autoload and any auto-heal data. Use this when a configured project keeps crashing the engine at startup; fix the autoload from inside the session, since the flag changes nothing on disk |
-w [ms] | Add a startup delay in milliseconds (useful for waiting for display initialisation) |
-f [path] | Load a specific .vpp project file on startup |
-playcomp [id] | Composition to start, by its ID (e.g. comp1); __all__ starts every composition. Starts playback and switches Show Mode on, whether or not Settings → Startup → Autoplay at Startup is on. It wins over the Composition / Cue configured in Settings → Startup, also when -f names the configured startup project. The Delay after Player Start setting (Settings → Startup) still applies |
-playcue [cue] | Cue to start from, same rules as -playcomp. Given without -playcomp, it plays that cue of the first composition — the configured Composition is not used once either flag is given |
-playvideo [path] | Directly play a video file without requiring a project file, with Show Mode on. Ignored when -f also names a project |
-ui | Open the web UI on start in the mode chosen in Settings → Startup (the Start Menu and Desktop shortcuts use this flag) |
-autoheal-restore | Restore playback state from auto-heal data (used by Watchdog) |
A flag that takes a value must be followed by one: if the next word on the command line starts with -, it is read as the next flag, not as the value, and the missing value is written to the log. Unknown flags are ignored and logged too.
Example: Kiosk Shortcut for a Specific Video
You can create a Windows desktop shortcut that opens Exaplay 3 and immediately plays a video — no project file needed. This is ideal for kiosk setups and visitor stations.
- Right-click the Desktop → New → Shortcut.
- In the Location field, enter:
"C:\Program Files\Exaplay 3\Exaplay3.exe" -playvideo "C:\Videos\welcome.mp4" - Click Next, name it (e.g. "Play Welcome Video"), and click Finish.
You can combine flags — for example, add -ui to also open the editor:
"C:\Program Files\Exaplay 3\Exaplay3.exe" -playvideo "C:\Videos\welcome.mp4" -uiTIP
Enclose file paths that contain spaces in double quotes. If the video file is not found, Exaplay 3 starts normally with an empty project.
-playvideo switches Show Mode on, so the output windows appear as soon as the video starts.
What's Next?
Your installation is ready! Continue to Key Concepts to learn the terminology, then follow the Quick Start Tutorial to play your first video.