
Appearance
Projection Mapping & Warp/Blend
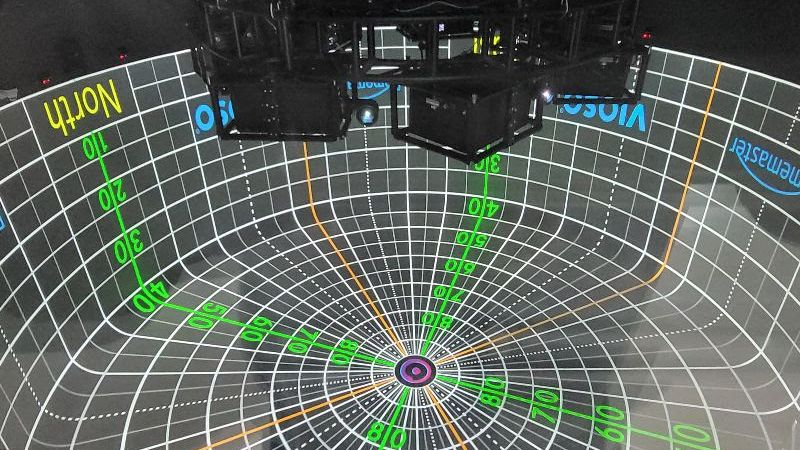
When projectors hit a real surface — two or more overlapping on one wall, a curved screen, a dome, a projector that is not square to the wall — the picture needs correcting: warping puts it on the surface, edge blending fades the overlap between neighbouring projectors so the seam disappears, and a black level lift evens out the darker areas. Exaplay does all of this on the STAGE tab, per screen (see Output Setup for what screens, fields and outputs are).
Which tool
| You have | Use | Where |
|---|---|---|
A camera-based VIOSO calibration (.vwf) | VIOSO calibration — warp, blend and black level exactly as measured | Screen → Calibration |
| Two or three projectors, a flat or gently curved wall, no calibration | Projection Setup — Exaplay's own warp grid, edge blend and black level, per projector | Screen → Warping → Manual Warping |
| A piece of content that must fit an object, not a projector | Field warp — a grid on one field | Field → Warp |
| Parts of the screen that must stay black | Content Mask | Screen → Content Mask |
| One clip that needs trimming or bending | Crop / corners and Media Warping of the clip | Clip Inspector in Produce & Play |
A screen uses either a VIOSO calibration or the Projection Setup: while a calibration is loaded, the Projection Setup's warp, blend and black level are not drawn on that screen — the calibration already did that job.
To see the wall without any of it for a moment — no VIOSO calibration, no warp, no edge blend, no black level — press Raw wall in the Stage header (see Raw wall below).
For the whole job from empty rig to show, see Projection Mapping Setup.
VIOSO calibration
A VIOSO calibration file (.vwf) holds one channel per projector — its warp, blend and black level, measured by camera. You create it in VIOSO 7 and load it on a screen in Exaplay; each output of the screen then draws one of the channels.
Which VIOSO 7 project template you use, and where the file goes, depends on the rig:
| Rig | Template in VIOSO 7 | Export |
|---|---|---|
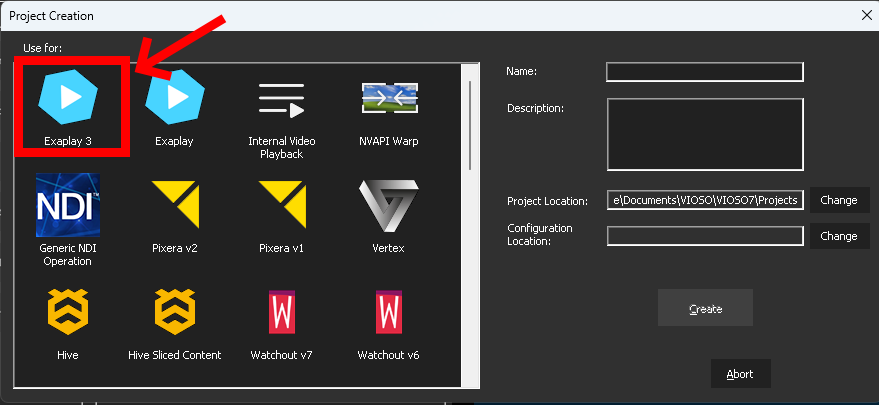
| Single client — VIOSO 7 and Exaplay on the same PC | Exaplay 3 | One .vwf, straight into Exaplay's calibration folder |
| Multi-client — the wall spans several PCs | Generic | One .vwf per PC, into the folder set under Destination Parameter |
Configuring, calibrating and editing in VIOSO 7 are described in the VIOSO documentation; this page covers what Exaplay needs.
Single client: VIOSO 7 and Exaplay on one PC
In VIOSO 7:
File → New Project, template Exaplay 3.
Configure the rig, calibrate and edit — see the VIOSO documentation.
Export. On a single PC the template exports the
.vwfstraight into Exaplay's calibration folder,Documents\Exaplay3\targetof the Windows user — there is no destination to set.
In Exaplay:
- On the STAGE tab, select the screen and click Load… in its Calibration group. The dialog opens in that folder (Calibrations); pick the file and press Load. Dragging the
.vwffrom the Stage's content browser (Media tab) onto the screen card does the same. - As a rule, that is all: VIOSO recorded where each channel sits on the Windows desktop, so Exaplay puts every channel on its output by itself and Status reads Applied (see What happens after loading).
Assigning by hand is needed only when the outputs no longer tell Exaplay which channel goes where — the assign tool then opens by itself:
- the Windows display layout changed since calibrating (an output moved or changed its resolution) and several outputs have the same size;
- the screen has more or fewer outputs than the file has channels — an output is assigned to another screen, or a projector was added or removed;
- the file was made for a split output that is not split in Exaplay yet (see Split outputs).
☰ menu → Walkthroughs → Outputs & projection → Load a VIOSO calibration shows these steps in Exaplay on one PC — loading the file and putting its channels on the outputs — recorded from the real Stage.
Multi-client: VIOSO 7 and Exaplay on several PCs
Put all PCs on one network and install the same VIOSO 7 version on each (check it under Options → Settings). VIOSO 7 runs on one PC and calibrates the projectors of all of them.
In VIOSO 7:
File → New Project, template Generic — not Exaplay 3: its automatic export into
Documents\Exaplay3\targetworks only on a single PC.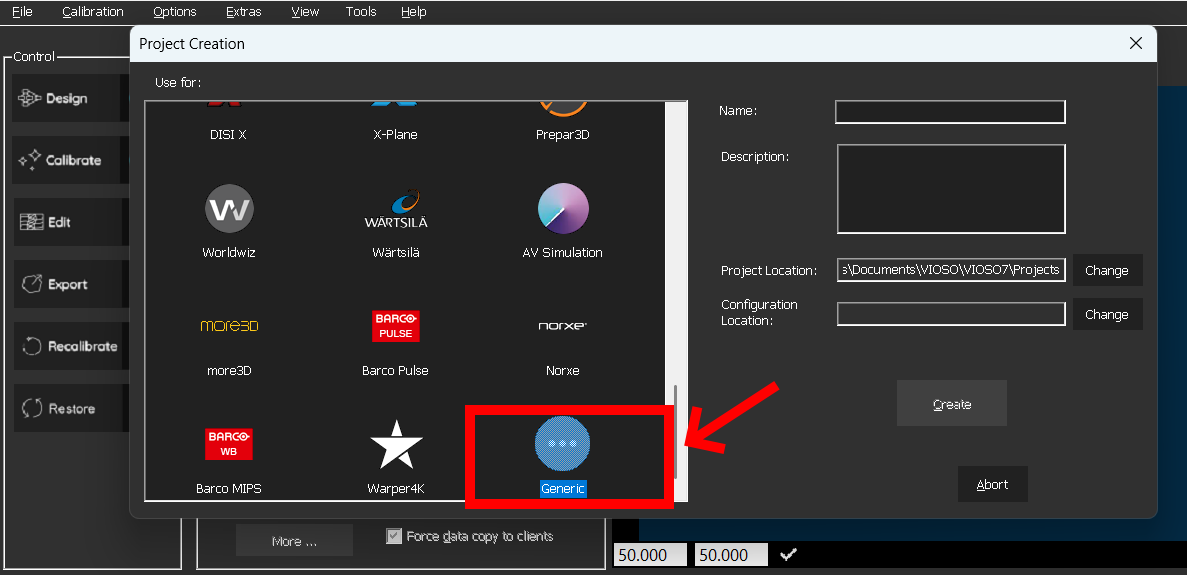
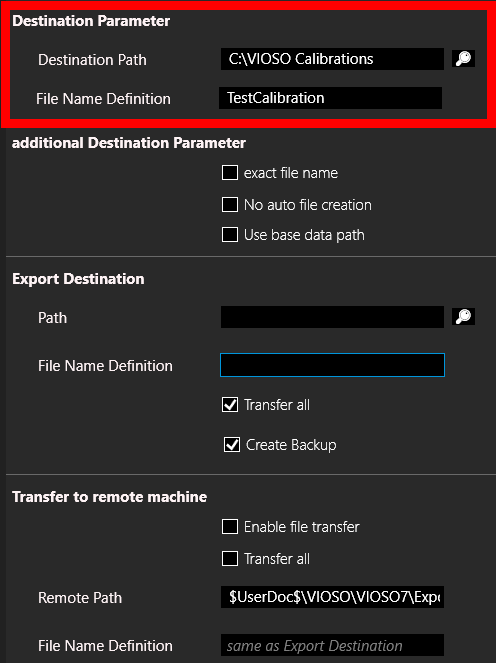
In the export node, set the Destination Parameter: Destination Path (the folder the calibration goes to) and File Name Definition (its name). Change nothing else.
Configure the rest of the rig, calibrate and edit — see the VIOSO documentation.
Export. The destination folder, on the PC VIOSO 7 runs on, now holds one
.vwfper PC, named<File Name Definition>_<IP address>.vwf— with the settings above,TestCalibration_192.168.49.73.vwfandTestCalibration_192.168.49.107.vwf. A file without an address (TestCalibration.vwf), if there is one, belongs to the PC VIOSO 7 ran on and is part of the set as well.
Exaplay loads the files from the master's disk: run VIOSO 7 on the master, or copy the files there — into Documents\Exaplay3\target, where the Load… dialog opens.
In Exaplay, on the master:
- On the STAGE tab, select the screen and click Load… in its Calibration group. Pick one of the files: Exaplay loads every file of the set with it — the same name before
_<IP address>, in the same folder. Files named otherwise: select all of them yourself (Ctrl+click), then Load. - Exaplay copies the files to every client (the fleet's file sync) and matches each file with its PC — by what VIOSO recorded in the file, else by the IP address in its name. Each PC then puts the channels of its own file on its own outputs, as a single PC does. A message reports the result — 2 calibration files loaded. Each PC draws its own…, or how many files matched no PC.
- Check Status: Applied means every PC draws its channels. If it reads Needs assigning ›, or a file matched no PC, open Edit….
Checking and correcting: the calibration's dialog. Edit… beside Status opens it on its Channels tab:
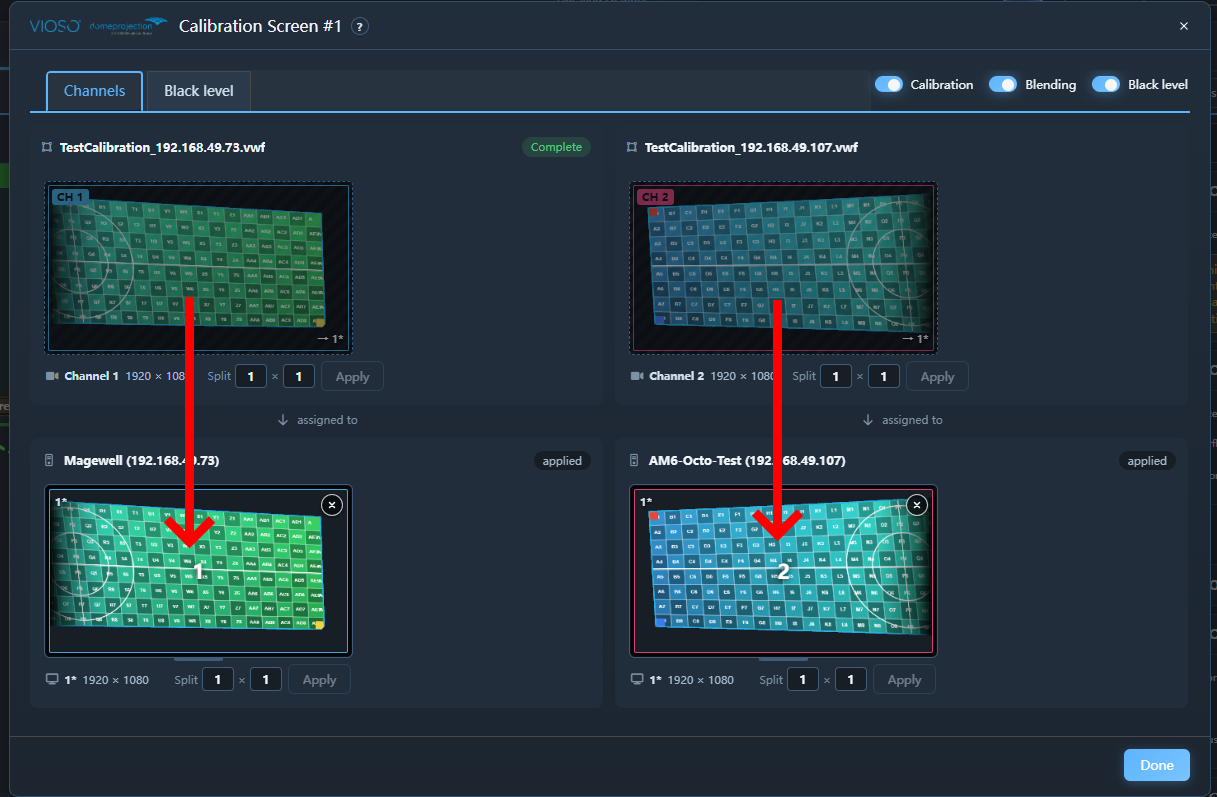
- Top: the files, each with its channels (CH 1, CH 2, …). A tile shows the VIOSO test image through that channel's warp and blend.
- Bottom: the PCs — name and IP address — with their outputs on this screen, each showing the channel it draws. Every file stands over the PC it was matched with (the arrows in the picture); a file that matched no PC, and a PC without a file of its own, come last in their row. Each row scrolls sideways on its own.
- Beside each PC, what it does: applied, copying · 40 %, waiting for the file (it keeps its previous calibration meanwhile), uncalibrated, needs assigning or not loaded. One count covers the whole calibration: 4 of 6 assigned, then Complete.
- To correct, drag a channel onto an output — of any PC, since every PC has every file. Dropped on an output that already draws one, the two swap; dragged back up, or with the × on the output, it comes off. A PC with no file of its own and no channel on its outputs shows the screen uncalibrated.
- On the wall, while the dialog is open, every projector shows the VIOSO test image through its channel — compare it with the tiles.
Every gesture of the dialog: Assigning channels to outputs.
Good to know:
- A PC draws only what its own outputs show: a PC with no output on the screen draws nothing of it — a master without projectors renders none of the calibrated wall, by design.
- What you assign for a client in Edit… is written into that client's output list; a client's own Stage stays read-only.
- Other VIOSO exports load as well — one file per machine named by its Windows computer name (
show_DC-1.vwf, …) and one file for the whole rig; see Multi-Client Setup.
What happens after loading
As soon as the engine has drawn the calibration once, Exaplay checks it against the screen:
It fits — every output of the screen draws exactly one channel, and every channel is on an output. Nothing pops up: Status reads Applied (hover it for the number of channels), and the screen's card on the Stage wears VIOSO's mark.
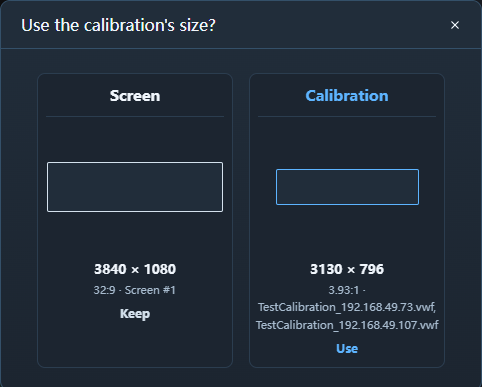
The size is clearly different — the screen's content resolution and the content space the calibration was made for differ in aspect by more than 2 %, or in a side by more than 25 %. Use the calibration's size? asks first, and shows the question as a picture: the screen's size and the calibration's, each drawn as a rectangle to one scale in its own shape, with its resolution and aspect ratio (4096 × 2160 · 1.90:1). Click the calibration's (Use) to fix the screen's Content resolution at that size, or the screen's (Keep) — or close the question — to leave it. On another size the picture is stretched or cut.
It does not fit — an output draws no channel or two, or a channel lands on no output. If the screen's outputs leave exactly one answer, the channels are put on them at once, without asking (see Assigning channels to outputs). Only when that is ambiguous does the assign tool open, so you can put each channel on its projector.
It cannot be loaded — one sentence says why (a missing file, a missing VIOSO component, …), and Status reads Not loaded.
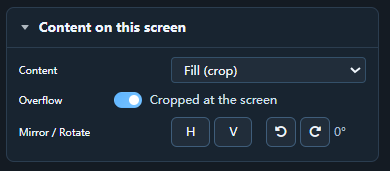
Content on this screen. For the show to cover the whole calibrated area, set the screen's Content to Fill (crop) — Fit, the default, leaves bars wherever the content's aspect ratio differs from the screen's.
The Calibration group
The group wears the VIOSO and domeprojection marks in its title. An output's Calibration card carries the same rows for the screen it shows (see An output's Calibration card).
| Row | What it shows |
|---|---|
| Calibration | Without a calibration: — None — and Load…. With one: the file as a pill — click its name to choose another file, ⟳ reloads the calibration file — for a projector that shows no picture although its channel is assigned (which output draws which channel, any cut and the black level stay), × removes the calibration (after asking). Under the pill: when the file last changed and how big it is — or, in red, that it is not on the engine's PC; hover it for the full path, and the folder icon opens the file's folder on the engine's PC, the file selected. A calibration of several files is named by their number — 3 calibrations — here and on the Stage (hover it for every file's name), and keeps to one line under the pill — 3 files · 612 MB · 21 Oct 2026, 18:08 (or, in red, how many are not on the engine's PC) — and the list button beside it opens every file with its size, date and folder icon. A .vwf dropped on this row loads here too. |
| Status | With a calibration: one word saying whether it is on the wall (hover it for the number of channels), then Edit… (opens the calibration's dialog — its channels and its black level) and Assign again (the wand): every output of the screen back to automatic, the channels put on the outputs as after loading the file (it asks first; the cuts and the black level stay). |
⟳ or Assign again? ⟳ is about the file: it is read again, and every output keeps its channel. Assign again is about the assignment: the file is not touched, but which output draws which channel is decided again.
| Status | Meaning |
|---|---|
| Applied | On the wall: every channel on its own output. Applied · Blending off (or Black level off, or both) when one of them is switched off. |
| Loaded | The file is read, but it is not on the wall yet — the screen needs an output on this machine. |
| Needs assigning › | Not every channel is on its own output. Click it: where the outputs leave only one answer, the channels go on them at once; otherwise it opens the assign tool. |
| Not loaded (red) | The engine could not load the file. Hover the line for the reason. |
| Waiting for files | Multi-client: a PC does not have its calibration file yet. It keeps its previous calibration until the file arrives; hover the line for which PC. |
| No channels | The file declares no channel — export it again from VIOSO 7. |
| Switched off | The calibration is loaded but switched off in its Edit… dialog (see Calibration, Blending, Black level). |
| Updating… | The calibration file changed on disk; the new one is being loaded while the current one stays on the wall (see Replacing a calibration). |
| Update not applied | The changed file could not be loaded. The current calibration stays on the wall; hover the line for the reason. |
Removing the calibration — the × in its pill, then Remove — returns the screen to the plain, unwarped output and clears its channel assignments (and any cut you put on its channels). To take the calibration off the wall without removing it, switch Calibration off in its Edit… dialog (below). To compare the whole wall with and without calibration for a moment, use Raw wall (below) — it changes nothing in the project.
Calibration, Blending, Black level
At the top right of the calibration's Edit… dialog, three switches act on the screen's calibration:
| Switch | Off |
|---|---|
| Calibration | The screen is drawn as if no calibration file were set: Exaplay's own warping, blend and black level apply, and the Inspector offers them again. The calibration stays loaded, so switching it on is immediate. |
| Blending | The calibration's edge blending between the projectors is off — every projector shows its full picture in the overlaps (useful to check an overlap or to align). The overall lift, which relies on the blend, then shows twice as bright in the overlaps. |
| Black level | Every black-level compensation of the calibration is off: VIOSO's own black level, a custom black level and the overall lift. The dialog's Black level tab is closed while it is off. |
Blending and Black level act on the drawn calibration, so they are greyed out while Calibration is off.
A switch takes effect in exactly one frame, on every output of the screen at once — no flash, no frame in between. In a multi-client rig every PC switches at the same moment. The switches are saved with the show, and on a master they reach every client.
They are on every remote control surface too, addressed by the screen's ID (screen1, shown in the screen's Inspector):
screen1.calibration=off
screen1.calibration.blend=toggle
screen1.calibration.black=on
screen1.get:calibration.blend
/exaplay/screen1/calibration/blend off— over TCP, UDP, OSC, in a cue script, a command button or a Stream Deck key (see TCP › Screen verbs and OSC › Screens). A switch made remotely shows in the dialog at once.
Replacing a calibration
Click the calibration's name in its pill — the dialog opens in the file's folder, the file selected — or drop another .vwf on the screen. If the new file has the same number of channels — a recalibration of the same rig — every output keeps the channel it was assigned; otherwise the assignments are reset, and the new file is checked as after a first load. (Removing the calibration first and loading the new one always resets the assignments.)
A recalibration exported over the same file needs nothing: Exaplay notices that the file changed and loads it again by itself, seamlessly:
- While the calibrator is still writing, the current calibration stays on the wall. Exaplay waits until the file is completely written — its size and date hold still and no program has it open for writing any more.
- The new calibration is then built next to the current one, which keeps drawing meanwhile (Status reads Updating…).
- When it is ready, the two are swapped in one frame — the wall never shows a frame without calibration. In a multi-client rig the new file is copied to every client that draws the screen, and all PCs swap at the same moment.
If the changed file cannot be loaded (it is broken, or it has fewer working channels than the current one), the current calibration stays on the wall and Status reads Update not applied. Exaplay tries again when the file changes again, or when the calibration is reapplied remotely (screen1.calibration.reload).
A very large calibration (several hundred MB) holds the picture still for a few seconds per projector while its new set is built — the old calibration stays on the wall throughout. Overwrite a large calibration between shows rather than during one.
A screen that carries several calibration files from an earlier version keeps them and still draws all their channels together; the group names the files (left.vwf + right.vwf). Loading a file replaces all of them.
Assigning channels to outputs
Normally the file decides which projector draws which channel: VIOSO records where each channel sits on the desktop (and, in a multi-machine set, on which machine), and Exaplay places the channels from that. On a correct calibration you never assign anything.
When the outputs leave one answer, nothing is asked. After loading — and when you click Needs assigning › — Exaplay puts the channels on the screen's outputs at once, without opening the assign tool, if:
- there is one channel and one output — whatever their resolutions;
- the outputs stand exactly as in the calibration file — the same layout and sizes, measured from their own corner: the same rig, even if the whole Windows desktop is shifted;
- or every resolution occurs exactly once on both sides.
A split in the file (e.g. 2 × 2 channels of one 1920 × 1080 output) goes onto the screen's output of that size when that output is already split in the same grid — the automatic assignment never splits an output (see Split outputs). Only when it is ambiguous — two outputs of one size that the layout cannot tell apart, a different number of outputs than the file needs, a cell of the output on another screen — does the assign tool open.
You need the calibration's dialog — the assign tool — for that exception, and when a projector shows the wrong slice, two show the same one, or one stays dark. Open it with Edit… in the Status row of a Calibration card — the screen's or an output's — or with a click on Needs assigning › when nothing could be assigned automatically. It is titled Calibration ‹screen› and has two tabs, Channels (open first) and Black level (Black level of a calibration). A large .vwf (hundreds of MB) takes a while to load and to picture: until it has, the Channels tab reads Loading the calibration… with the channel it is on. The Channels tab:
- On top, the calibration — headed by the file's name (point at it for the whole path) — with its channels, numbered CH 1 to CH N, in a dashed frame: what the file brings. Each tile is what that projector shows — the test image through the channel's own warp and blend, filling the tile. A channel that is on an output is dimmed and names it (→ 2). The channels of a split in the file (one output cut into cells) sit together, laid out as their cells, captioned Split of the file · 1920 × 1080 · 2 × 2 · in the file. A channel without a split of its own has Split fields (columns × rows) under it — see Cutting a channel.
- Below, the PC — headed by its name and IP address, e.g. Prod123 (192.168.10.1) — with its outputs connected to the screen, drawn as monitors at the same height as the channels: every output on the screen, and every split output with at least one cell on it, laid out as in Windows; a split output is shown as its cells. A cell that shows another screen is greyed and takes no channel; a free (unassigned) cell takes one and joins the screen with it. Split under an output (columns × rows) splits it into cells.
- In a multi-client rig, the files and the PCs are two rows, each file over the PC it was matched with — see Multi-client. Any channel goes onto any output of any PC. While you drag a channel, holding it near a row's left or right edge scrolls that row; the mouse wheel scrolls a row too. An output a client places by itself reads auto.
- While you drag, the output under the pointer already shows what the drop will do — the channel, and on the output it comes from, the channel it gets back in a swap.
- While the dialog is open, the screen shows the VIOSO test image on the wall, so every projector shows exactly what its tile shows. Closing the dialog puts the screen's previous test pattern back (normally none — the show).
| To | Do |
|---|---|
| Put a channel on an output | Drag the channel onto the output — or click the channel, then the output. The output draws it at once. |
| Swap two outputs | Drop a channel on an output that already has one: the two swap — on one PC or across two. |
| Move a channel | Drag the output's tile (anywhere on it) onto another output — or click it on the output, then click the other output. |
| Take a channel off | Drag the output's tile back up onto the channels — the row reads Drop here to take channel N off its output while you drag — or click the round × on the output (red under the pointer). |
| Split a monitor | Type the columns and rows into the two Split fields under the output and press Apply (1 × 1 takes the split off). A split output also has Clear all, which takes every channel off it at once. Use it when one output feeds several projectors through a splitter — e.g. a 3840 × 1080 output feeding two 1920 × 1080 projectors (2 × 1). An output's split is its own: cutting a channel never changes it, and splitting an output never cuts a channel. |
| Put a whole split on an output | Drag the split by its Drag whole split handle (on the top of its frame) onto an output: the output is split in the same grid and every cell gets its channel — the calibration maps its picture onto whatever size the output has. Only the handle splits an output: a single channel of a split, dragged on its own, goes on the output as one channel and never changes its split. |
| Cut a channel into cells | Type columns × rows into the two Split fields under the channel and press Apply — see Cutting a channel. |
| Use an output of another screen | It is not offered here. Assign the output to this screen first — e.g. Assigned screen in its inspector; it then appears in the tool, and the free channel follows onto it. |
The pill beside the (first) file name counts n of N assigned for the whole calibration — every file, every PC — and reads Complete once every channel is on its own output; the button at the bottom then reads Done instead of Close. Every change is saved in the project at once — the .vwf file itself is never changed.
Which projector is which?
With the dialog open, every projector shows the test image through its channel. Compare the wall with the tiles: the projector whose picture matches tile 3 draws channel 3. Identify in the Stage header also labels every output on the wall with its name and the channel it draws.
What to look for in the test image, on the tiles and on the wall:
- Orientation. The test image has a coloured square in every corner — top left red, top right green, bottom left blue, bottom right yellow. A mirrored or rotated mapping shows at once.
- Place. It is a checkerboard whose cells are named — columns A, B, C … from the left, rows 1, 2, 3 … from the top — and coloured by where they are: blue on the left turning green on the right, darker towards the bottom. Cell names tell you which part of the canvas a projector shows.
- Shape. The grid's straight lines and the circles in the centre show the deformation the calibration applies.
- Blend. Dark edges are where VIOSO fades into the neighbouring projector; on the wall, the joins between projectors should line up.
Split outputs: Mosaic, expanders, splitters
A split comes in when Windows sees one output where several projectors hang:
- NVIDIA Mosaic (or AMD Eyefinity) joins several outputs of the graphics card into one large display — one 3840 × 2160 monitor for four 1920 × 1080 projectors;
- an expander or splitter after an output (a Datapath Fx4, a Matrox TripleHead2Go, …) cuts one signal into several.
VIOSO calibrates each projector as a channel of its own. Exaplay therefore cuts the output into cells — columns × rows, one per projector, up to 64 per axis — and puts one channel on each cell.
Exaplay splits for you when the .vwf declares the split — VIOSO knew the projectors share one output; in the dialog such channels sit together, captioned Split of the file:
| You | Exaplay |
|---|---|
Drop the .vwf on that output on the Stage | splits the output in the file's grid and puts every channel on its cell — in one step |
| Drag the split by its Drag whole split handle onto an output in the dialog | does the same on that output — the calibration maps its picture onto the output's size |
| Load the file while the output is already split in that grid | puts the channels on the cells by itself |
Loading the file on the screen alone never splits an output: the assign tool opens, and the handle does it there.
Without a split in the file, split the output yourself — Split (columns × rows) under the output in the dialog, then Apply — and put each channel on its cell. A channel that itself covers several projectors can be cut the same way (below).
Changing the arrangement afterwards. A cell takes channels like any output: drop a channel on a cell that already draws one and the two swap — in the dialog, or on the Stage by dragging one cell onto another. If the cables at the splitter are swapped, or a projector is moved to another port, swap the channels instead of re-cabling or calibrating again. The .vwf is never changed; the arrangement is saved with the project.
Cutting a channel into a split
A channel that has no split in the file can be cut the way an output is split: type the columns and rows into the two Split fields under the channel and press Apply. Typing alone changes nothing — the numbers stay highlighted and Apply lit until you apply (any whole number up to 64 each — anything else is marked red and keeps Apply off; 1 × 1 takes the cut off). The cut is on the wall at once — no reload of the file. It cuts the channel only: the outputs keep their own splits. The calibration then draws that channel as cells, each a channel of its own in its place — they take the next numbers, the following channels move up — captioned Channel 1 · cut · 2 × 1. Drag the group onto an output: the output is split in the same grid and every cell gets its channel, as with a split from the file.
- A cut changes how many channels there are, so the channel assignments of the screen start over; where the outputs leave only one answer — an output already split in the cut's grid — the cells go on them at once. An output that is not split that way stays as it is: split it yourself, or drag the group onto it.
- The cut is stored with the screen; the
.vwffile is never changed. Loading another file starts uncut; removing the calibration (×) removes the cut with it. - A split the file declares is the file's: it has no Split fields.
Channels twice as far apart as they should be
Some VIOSO exports of a split output (a mosaic or splitter feeding several projectors from one output — typically a Collected export) write each channel at its own cell position, and the channels then land about one cell too far out: several projectors stay dark. Assigning the channels in the assign tool fixes it — an assigned channel is drawn at its output, whatever the file's positions say. The other way is Settings → System → VIOSO: per-cell split offsets, switched on on every machine that loads such a file.
Black level of a calibration
A projector cannot show true black: on black content it still puts out some light. Where projectors overlap, that light adds up — the edge blend fades the picture across the overlap, but it cannot take this residual light away. In a dark scene every overlap therefore shows as a lighter band, and a corner where four projectors meet as a lighter patch.
The black-level compensation evens this out. VIOSO measures the black of every area with the camera and stores in the .vwf how far each projector has to lift its black outside the overlaps to match the brightest black on the wall. The whole wall then has one even black, slightly above the projectors' own — a little contrast in dark scenes is the price. Exaplay applies the compensation to every frame.
You set it on the Black level tab of the calibration's dialog (Edit… in a Calibration card, the screen's or an output's). While the tab is open, the screen shows a dark test image under the black level, which stays on; Channels puts the VIOSO test image back, closing the dialog the show. The Black level switch at the top right of the dialog turns the whole compensation off and on — the quickest before/after comparison.
| Control | Range (default) | What it does |
|---|---|---|
| Black Scale | −100 % to +100 % (0 %) | Scales VIOSO's measured lift: 0 % = as calibrated, −100 % = off, +100 % = doubled. The only VIOSO control that shows on pure black. Areas outside the overlaps still darker than the overlaps: raise it. Brighter, so the overlaps now look like dark frames: lower it. |
| Black Darkness | −100 % to +100 % (0 %) | How much of the lift dark content keeps (just above black): 0 % = as calibrated, −100 % = none, +100 % = all. Overlaps that show again as lighter bands in dark greys: raise it. Dark greys outside the overlaps that look washed out: lower it. |
| Black Brightness | −100 % to +100 % (0 %) | The same for bright content. It has no effect on black — judge it on Ramp or Stars. |
| Input Gamma | 0.5 to 5.0 (2.2) | The gamma in which the lift is added: VIOSO turns the content into light, adds the lift and turns it back. Set it to the projectors' gamma (2.2 for most). Black and full white do not move with it; a wrong value shows in the dark greys, which then do not even out at any Black Darkness. |
| Overall Lift | 0 to 25 % (0 %) | Exaplay's own: one uniform black floor added to the content before the warp, on top of the black level that is on. It runs through the calibrated blend, so the overlaps do not get it twice. Use it to mirror a raised overall brightness from VIOSO's black-level settings (the .vwf does not carry it), or to bury what remains of a seam under a common floor — every percent costs contrast. With Blending switched off it shows twice as bright in the overlaps. |
The sliders act on the wall while they move and are saved with the screen. Reset to defaults puts back the calibration's own black level, 1:1: every VIOSO slider at the file's value (Input Gamma 2.2), no Overall Lift, the custom black level off and Blending on.
The test images
The Test image row picks what the wall shows while the tab is open — all of it dark, because a black level is judged in the dark:
| Test image | What it shows | Judge with it |
|---|---|---|
| Black | Black content — the black floor alone | Black Scale, Overall Lift |
| Grey steps | Eight horizontal bands, 0 % at the top to 10 % at the bottom | Black Darkness, Input Gamma |
| Ramp | A smooth ramp from black at the top to 15 % at the bottom | Input Gamma, Black Darkness, Black Brightness |
| Stars | A starry sky — small dots of 4 % to 70 % on black, the same sky on every PC of a fleet | A dark show across the seams; Black Brightness |
The bands and the ramp run horizontally, so every vertical seam crosses all of them.
Testing the black level
- Prepare the room as for the show: as dark as it will be, the projectors warmed up for at least 10 minutes and in their show settings (lamp or laser power). Switch off dynamic contrast, dynamic black and auto iris on the projectors — they change the black with the content, and no compensation can follow them.
- Look from where the audience will be. A camera or a phone with automatic exposure exaggerates or hides black levels; trust your eyes, or set the camera to manual exposure.
- Open Edit… → Black level. If earlier changes are unclear, start from Reset to defaults.
- Black: the overlaps must vanish into the rest of the wall. Correct with Black Scale; switch Black level off and on to compare. Raise Overall Lift only if the wall should have a higher common floor.
- Grey steps: every band must be one even tone from edge to edge, across every seam. Correct with Black Darkness. If no setting evens out all bands at once — the lower ones right and the upper ones wrong, or the other way round — correct Input Gamma.
- Ramp: it must run smoothly across the seams. A band or a kink at a seam is a lift that bends the curve: Input Gamma, then Black Darkness; for the brighter part at the bottom, Black Brightness.
- Stars: this is how a dark show looks. No seam may show in the black between the stars, and a star must keep its brightness across a seam.
- Finally, play the show's darkest real content and look again.
Custom black level (Debug Mode, experimental). With Debug Mode on, a Black level switch above the sliders chooses between VIOSO calibration — the calibration's own black, set with the sliders above — and Custom, Exaplay's own black-level shapes and Dome Auto-Black. Never both: while Custom is on, VIOSO's own black is off; Overall Lift applies under either. A screen left on Custom shows the switch outside Debug Mode too, so it can be put back.
To change the blend itself, re-run or edit the calibration in VIOSO 7 and load the new file.
The calibration on the Stage
- A calibrated screen's card wears VIOSO's mark in its title bar, with a dot in front when it needs a look; hover it for the file, click it to select the screen — its Calibration card opens with it.
- The screen card itself shows the raw content only — no calibration picture.
- With the screen open (the ⌄ under its card), its outputs stand in their output order, inside a frame headed by VIOSO's mark and the file's name. Each output (or cell) shows its channel's test image through its warp and blend — the same picture as in the calibration's dialog.
- Drag such an output (or a cell) onto another output of the same calibration: that only reassigns calibration channels, exactly like a drop in the dialog — the two trade their parts of the calibration (the pictures change places, the outputs stay where they are), and one without a channel takes the other's. The outputs' arrangement and the Windows layout never change (unlike Rearrange); dropped anywhere else, the output goes back.
VIOSO Calibration. A screen with a calibration is in VIOSO Calibration: the Alignment under an output's Assigned screen and in the screen's Output Assignment reads so, because the calibration places the outputs. As in Windows and Rearrange are not offered while it does — remove the calibration to arrange the outputs freely. Picking VIOSO Calibration on a screen without a calibration opens the Load… dialog. See Arranging the outputs.
An output's Calibration card. Select an output: its Calibration card, under the same VIOSO and domeprojection marks as the screen's, shows the calibration of the screen it shows with the screen card's rows — Calibration (Load…, or the loaded file as a pill with ⟳ and ×; a .vwf dropped on the row loads here too) and Status (Edit… opens the calibration's dialog, Assign again puts the channels on the outputs again) — then, with Debug Mode on, the output's ProjectionTools channel. An output whose cells show several screens has one set of rows per screen, labelled with the screen's name. Which channel the output draws is shown in the dialog and on the Stage.
Projection Setup — warp, blend and black level per output
For a wall without a VIOSO calibration Exaplay has its own editor. It works per output: each projector gets its own warp grid, its own edge blend and its own black-level lift, the way a projector's own menu would, drawn on that output alone.
Select the screen, open Warping in the inspector and press Open editor in its Manual Warping row (the switch beside it turns the whole setup off and on without losing it). The editor lists every output the screen owns on the left — this machine's (each cell of a split output counts as its own projector) and each client's — and edits one at a time; the badges W, B and K on a row say that output is warped, blended or has its black lifted. Everything you change is on the wall at once. Each card's ? shows a short explanation, and More holds the less common controls.
While the screen has a VIOSO calibration, Warping is off — off · calibrated in its title — and so is an output's Overlap & Blend: the calibration warps and blends the screen, and Exaplay's own warp and blend are not drawn on top of it. Remove the calibration to warp and blend by hand.
Walkthrough
☰ menu → Walkthroughs → Outputs & projection → Two projectors, one picture shows two overlapping projectors blended, from the overlap on the Stage to the Vernier check, recorded from the real Stage.
Warp — corners first
Start with Corners in the Grid row (the default): pull the four corners onto the surface and the picture is square. Then refine to 3×3, 5×5 or 9×9 to pull the middle of the image — every point keeps its place, only new points appear between them. The row only refines; any other size from 2 × 2 to 9 × 9 is under More → Any size.
Mode decides what happens between the points: Linear (the default) keeps the mesh straight, Spline smooths it, and Perspective (4 corners) takes the four corners as a true perspective — straight lines stay straight everywhere, which is what a projector that is not square to the wall needs (a linear 2×2 bends the inside of a keystone). Perspective uses the corners only: interior points are ignored and the grid stays at its size. The canvas draws faint interior guides at a 2×2 so you can see the difference before the wall does.
The whole screen at once. The first row of the list, Whole screen, is one grid over the entire canvas, drawn on top of every output's own — bend the wall as a whole there (a gently curved surface, a picture that has to lean), and fix a single projector on its own row. The outputs are drawn faint on that canvas so you can see which projector a point lands on.
| Action | How |
|---|---|
| Select point | Click it, or Tab / Shift+Tab through the grid |
| Select several | Shift+click adds a point; drag on empty canvas to rubber-band a region; the handles left of and above the picture take a whole row or column (click selects, Shift adds); Ctrl+A takes all. Escape goes back to one point — pressed with one point selected, Escape closes the editor |
| Move point(s) | Drag any selected point, or a row / column handle, or the arrow keys — 1 output pixel per press; everything selected moves together. Alt while dragging moves a tenth of the mouse |
| Coarse / fine | Shift + arrows moves 10 px, Ctrl + arrows 100 px (PageUp / PageDown too), Alt + arrows 0.1 px — the step chip under the canvas shows which is armed while you hold the key |
| Type a position | The X / Y fields under the canvas, in output pixels — for a measured value |
| Pin one spot | Double-click the picture where it is wrong (or Add pin, then click). Drag the pin's diamond and the picture follows it, fading out over the pin's radius; scroll over the pin to change the radius (or type R under the canvas); drag its small dot to move where the picture is held; Delete (or Backspace) removes the selected pins, Clear in the Pins row removes all of them. Several pins add up, and a pin never needs a finer grid |
| Straighten | The Warp card's Straighten button (takes the pins with it) |
| Undo / Redo | Ctrl+Z / Ctrl+Y (or Ctrl+Shift+Z), per output |
A pin is the local fix a grid cannot give without going 9×9 everywhere: a bump in the plaster, one warped panel, a seam that is right except for a hand's width. It moves the picture at one spot by exactly the drag and by less and less out to its radius, so the correction stays smooth and the rest of the projector is untouched. Pins are applied after the grid, so refining or straightening the grid later leaves a pin on the wall feature it fixes.
Wall mode (header) draws the selected point as a crosshair on the projector it belongs to, so you can stand in front of the wall and nudge with the arrow keys without looking at the monitor. Bypass (header) shows the wall as if nothing were set — the before / after of every projector of this screen at once; press it again to put the setup back. The three chips beside it bypass Warp, Blend or Black on their own: look at the warp without the blend, or at the raw overlap without the lift.
Edge blend
Switch Enabled on. The blend width is the overlap: how far this output and its neighbour overlap on the Stage canvas. The card says so under Overlap on the Stage — one line per neighbour (Right · with Beamer R 240 px), and the number is the overlap itself: type the overlap you measured on the wall (or nudge it with ↑ / ↓ — Shift ×10, Ctrl ×100) and the second output moves on the show canvas so the two overlap by exactly that. It is the same dial as the Overlap number in the output's Overlap & Blend card (see below), and the same edit as dragging the output's box on the Stage.
With Auto widths from overlap on (the default), each edge's band is that overlap — change the overlap and the band follows. Switch it off to type a width per edge instead; the overlap line stays, because it is still where the two projectors meet. When nothing overlaps this output yet, the card says so and names the two ways out: arrange the outputs on the Stage so they overlap, or switch Auto off and type the widths. A seam whose other projector is on another machine is marked (other machine).
Curve shapes the fade (2 is the usual smooth S, 1 a straight ramp) and Gamma is the projector's own (2.2 for most). The curve is drawn so that two facing ramps always add up to exactly one on the wall, whatever the curve — the seam disappears when the gamma matches the projector. Highlight zones paints every band on the wall in colour while you line things up.
A seam that is right in grey but breaks in one colour — a reddish or greenish band — is a projector whose red does not have its green's gamma (lamps age unevenly). Open Gamma per colour and trim that one channel; Same as gamma puts all three back. The curve preview draws the trimmed channels in their colour.
The Stage already knows where the seam is
Select an output on the Stage: if it touches or overlaps another output of its screen, its inspector has an Overlap & Blend card with one block per neighbour holding the Overlap in px and an Edge blend switch; hover the row to see which neighbour it is (With Beamer L (left)). The two outputs of a seam show the same pair, each from its own side.
The Overlap number is a dial: type the overlap you want or measured on the wall (or nudge it with ↑ / ↓ — Shift ×10, Ctrl ×100) and this output moves on the show canvas so the two overlap by exactly that. Two outputs that sit edge to edge read 0 px — typing an overlap there is how the first overlap is made, because a drag on the Stage never overlaps outputs; 0 puts them edge to edge again. The move is the same as dragging the output's box, so the screen goes on a custom canvas layout and the blend bands follow. Read the overlap off the wall with the Vernier pattern below.
The Edge blend switch is never switched on by typing an overlap. Click it and both outputs blend over the overlap, widths from the layout; click it again and both stop (the overlap is then brighter on the wall). While it is on, the Vernier pattern reads the real overlap off the wall and the reading is typed straight into the number. With the screen open on the Stage, its card also carries a … · Blend chip for an overlap nobody blends yet — one click on it does the same as the switch.
Black level
Projectors never go fully black, so where two of them overlap the black is twice as bright as where one lights the wall alone — and where four meet in the corner of a 2×2 wall, four times. Lift raises the black where this projector lights the wall alone; set it so that area matches the brightest overlap. With Balance overlap zones on (the default) every zone in between follows automatically: on a 2×2 wall each projector adds a third of the lift into the bands where two overlap and nothing into the corner where four do, so the whole wall ends at one black. The canvas labels every zone with how many projectors light it and its share of the lift. Feather softens each step between zones. Switch the balance off for the classic rule — the single-lit area lifted, every band left alone. Lift zone per edge lets a zone be wider or narrower than the blend band when a bright seam or a dark gap remains. The Tint matches a projector whose black is not neutral.
On the wall
Pattern replaces the show while you set up (drawn through the warp like real content) — Show content puts the show back: Grey 50 % (seam test) is the seam test — a blend that is uniform at mid grey is right at every level a picture is likely to have; Grey steps 10 / 30 / 50 / 100 % shows four levels at once (10 / 30 / 50 / 100 %), so a wrong black level shows in the dark stripe and a wrong gamma in the bright one; Grid + circles, Checkerboard and Colour ramp are there for the warp. Vernier (overlap check, ×20) is the overlap check: inside every blend band both projectors draw fine stripes, one at 6 px and the other at 6.3 px, so a fringe of darker bars appears across the band and moves 20 px for every pixel the overlap is off (the second projector's pitch is the coarse one). Correct the overlap until the fringe sits on the white centre mark — type the reading into the Overlap dial of the output's Overlap & Blend card (or of the Edge blend card above), nudge it with ↑ / ↓, or move the second output's box — and the layout matches the wall to the pixel. Identify labels every output. The Band lens shows what this projector sends into each of its blend bands, magnified and live, read back from the engine — not the wall itself, but the one place the ramp's shape and a per-colour trim can be checked without walking up to the seam.
Copy setup takes another output's warp, blend and black level onto this one — mirrored left ↔ right (or top ↔ bottom) for the projector facing it, so a pair is set up once — and Blend curve → all puts this output's curve, gamma and colour trims on every other output of the screen, leaving their widths alone.
Undo / Redo (header, Ctrl+Z / Ctrl+Y) work per output, Revert puts every output back to how it was when you opened the editor, and Reset this output clears its warp, blend and black level (on the Whole screen row the button reads Straighten the whole screen). Close — or Escape — leaves the editor; everything is already stored.
Fleet
Each machine keeps its own projectors' setup: the master edits a client's outputs in the same list, and the values travel with the show to that client and survive its reboot. One rule for a seam that spans two machines: each engine's auto widths see only its own projectors, so that seam is offered on the Stage (the … · Blend chip, or the Edge blend switch of the output) and switched on with the layout's width written explicitly on both sides. Type the width yourself if you place the projectors without the Stage arrangement.
Open the editor on the master. On a client it is read-only (Read-only on a client — set this up from the master.).
Raw wall: the picture without its calibration
Raw wall in the Stage header shows the outputs — on a multi-client rig, every machine's — without any of their projection correction — no VIOSO calibration, no Projection Setup warp (per output or whole screen), edge blend or black level, no Overall Lift. It answers is it the calibration, or is it the picture? If the right picture is there raw, the content, the outputs and their assignment are fine and the calibration is what to fix.
- What stays: NDI sends, the Content Mask, and the Projection Setup's Wall-mode crosshair and Vernier pattern (they measure the layout, not the correction).
- Nothing in the project changes, so nothing is saved or synced.
- While it is on the button is amber and the top bar of every tab says Raw wall ON; click either to switch the correction back on. It comes back at once.
- On a multi-client rig, switch it on the master: every client follows, and one that restarts or reloads follows again within a second. A client that has not followed is named in the button's tooltip.
- Loading a project and restarting the engine turn it off, so a show always starts corrected.
This is different from the Projection Setup's own Bypass, which compares one screen with and without its manual setup.
Field warp
Independently of the projectors, an additional field can carry its own warp — to fit a piece of content onto an object rather than to correct a projector. (The screen's own content has none: it is warped with the screen.) Select the field on its screen card on the Stage and open Warp in the inspector. Its settings are there as soon as the card is open; the Warping switch at the top decides whether the output applies them. While it is on, the grid is drawn over the field on the canvas.
| Control | What it does |
|---|---|
| Grid | 2×2, 3×3, 4×4 or 5×5 control points |
| Interp | Linear or Bilinear between the points |
| Select a point | Click it, or Tab / Shift+Tab through the points |
| Move it | Drag it; or the arrow keys — 0.01 per press, Shift + arrows 0.1 (the chip beside the point shows ±0.01 / ±0.1); or type its X / Y offset |
| Deselect | Esc or Enter |
| Reset | All points back to zero |
| Mirror H / Mirror V | Swap the warp left ↔ right or top ↔ bottom |
| Snaps | Opens Snapshots: Save the current warp, restore (↺) or delete (✕) one later. Snapshots last while the page is open; they are not saved with the project |
The offsets are fractions of the field (1 = the field's full width or height), not pixels.
Switch Outlines on in the Stage header to see every screen's and field's box on the real outputs while you work.
Only with Settings → System → Debug mode on: the card also carries a Polar / Spherical (dome) layer (a fisheye-style radial correction on top of the grid: Projection Linear, Equidistant, Equisolid, Stereographic or Orthographic, with Center X, Spring line, Radius, Dome FOV, Focus and Rotation). It is still in development and not production-ready — for a dome, use a VIOSO calibration (see Dome Projection). With Debug mode off the layer's controls and its preview are hidden, and a polar layer a project already uses keeps working unchanged — Reset and a restored snapshot leave it alone until Debug mode is on again.
The Dome mask of earlier versions has been removed. A project that used it still loads — without the mask. To hide the corners around a round picture, use a Content Mask (an inverted, feathered ellipse).
Content Mask
A screen's Content Mask hides parts of its picture — a doorway, a pillar, the corners of a round screen. Switch Content Mask on in the screen's inspector and follow Open mask editor…: draw Rect, Ellipse or Polygon shapes over the screen (Finish closes a polygon), with Feather, Corner Radius and Invert. Mask enabled off keeps the shapes without applying them. A mask is not part of the calibration: it stays on under Raw wall.
Point-Based Warping (3D)
Only with Settings → System → Debug mode on — not yet production-ready. A screen's Warping group then has a Point-Based Warp (3D) row with Open editor and an on/off switch: choose a surface model or import a GLB/OBJ mesh, place a virtual projector and solve its pose from projected crosshairs. The same Debug mode shows the Black Level Editor under the sliders on the Black level tab of the calibration's dialog (Edit… in a Calibration card) while a calibration is loaded — a shape-based replacement for the calibration's black level. + Patch adds a patch in the middle of the projector, ready to move and size; Draw patch draws one by dragging.
Checking the result from your desk
The Output Preview (header) shows a screen either before correction (Comp) or as its output renders it, with warp and blend (Output) — see Output Preview. What the projectors really do in the room is still the room's answer: use Identify and the test patterns for that.
VIOSO tools
Exaplay does not calibrate by camera itself — that is VIOSO 7, VIOSO's calibration software, a separately licensed VIOSO product installed on the machine. Create and export the calibration there, then load it as described above.