
Appearance
Timeline
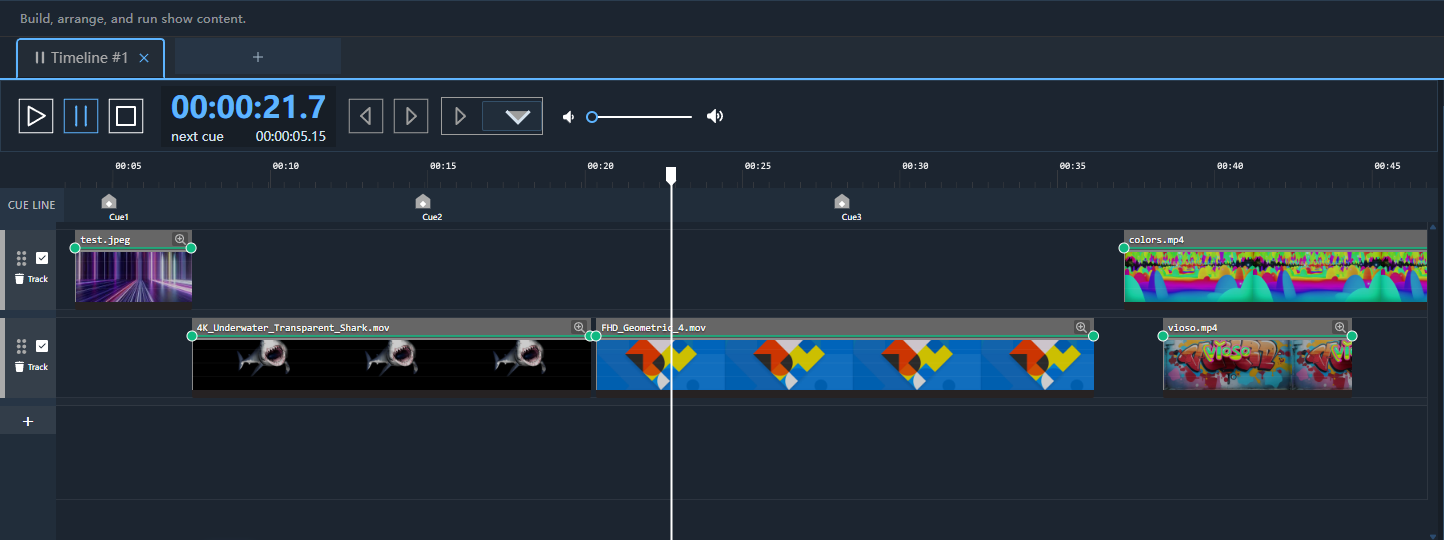
The Timeline is the primary composition tool. It arranges clips in time across multiple tracks and displays the playhead position.
See it done
Open ☰ menu → Walkthroughs → Playlists & timelines → Trim, slip and split by picture: a clip trimmed, slipped and split against the pictures of its own thumbnail strip.
Anatomy of the Timeline
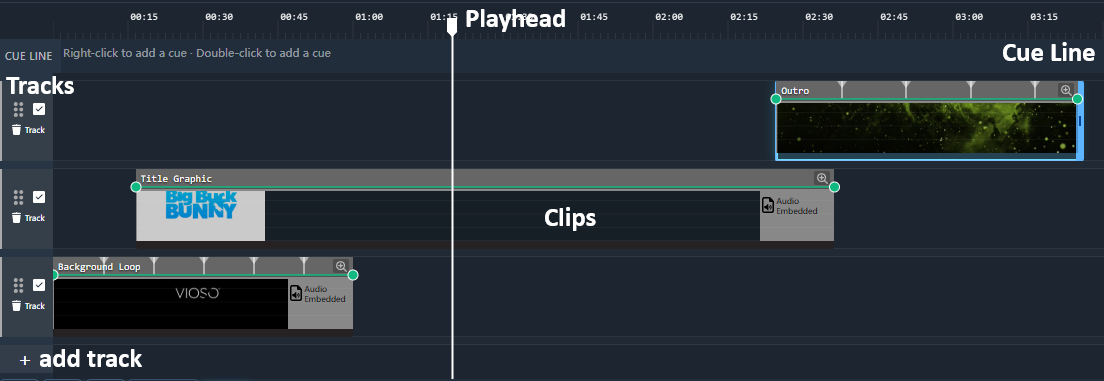
Tracks
- There is no fixed limit on the number of tracks in a composition — in practice the ceiling is what the machine can decode and draw per frame, not a count.
- The top track in the list is drawn in front; each track below it is drawn behind the one above.
- The + button under the track list adds a track at the bottom — behind everything else. Its caret (▾) offers + Data Track.
- Right-click a track for Add Track Above, Add Track Below, Add Data Track and Duplicate Track.
- Rename a track by double-clicking its name, or select it and press
F2; Enter saves, Esc cancels. Clips and cues are renamed the same way (new in 3.5). - A Data Track to emit keyframe values over OSC / UDP / TCP / Art-Net / DMX, drive Operator Control readouts, or drive one of Exaplay's own values (a shader parameter, a volume, a clip position) — see Data Tracks (new in 3.2).
- Drag the track header to reorder.
- Collect tracks in a group to fold, hide, fade or turn down several of them at once — see Timeline Groups.
Duplicating a composition copies its full content, including every track (3.2 fixes an earlier case where some tracks were dropped). Right-click a composition tab and choose duplicate composition.
Clips
| Action | How |
|---|---|
| Add | Drag from File Browser |
| Move | Drag the clip body |
| Trim start (in-point) | Drag the left edge — the clip's In point moves with it and every frame stays where it was in time (new in 3.5) |
| Extend start | Alt + drag the left edge outwards — the clip starts earlier and repeats to fill (new in 3.5) |
| Trim / extend end | Drag the right edge |
| Split | Right-click the clip → Split clip here, or Ctrl + K to split at the playhead (new in 3.5) |
| Slip (move the media inside the clip) | Alt + drag the clip's picture — the clip keeps its place and length, a different part of the media plays in it (new in 3.5) |
| Delete | Select + Delete (or Backspace), then confirm with Enter |
| Ripple Delete (delete and close the gap) | Right-click a single clip → Ripple Delete, or Shift + Delete — its neighbours end up flush against each other (no confirmation) |
| Insert Time… | Right-click a track, empty space or the ruler → Insert Time… — opens blank space on every track at the playhead |
| Close a gap | Click the gap between two clips to select it, then Delete — or right-click the gap → Close Gap |
| Select several | Right-click → Select All Clips, Select All Clips to Left or Select All Clips to Right |
| Copy / paste | Ctrl+C / Ctrl+V pastes at the playhead; right-click → Paste pastes at the time you clicked. The clipboard is shared with Playlists: clips copied here can be pasted into a playlist (3.5) |
| Rename | Select the clip and press F2, or double-click its name in the clip head; Enter saves, Esc cancels (new in 3.5) |
| Group | Select tracks by their headers (Shift + click for a range, Ctrl + click to add one) and press Ctrl + G; or right-click the empty area below the tracks → Create New Group, or right-click a track → Group Track (with several tracks selected: Group N Tracks) to wrap it in a new group where it sits. The group's header shows what it holds ("2 tracks · 1 data track", or "… hidden" while folded). Right-click the header for Rename, Add Track / Data Track to Group, Duplicate Group (with every row and clip), Collapse / Collapse All, Ungroup (dissolves the header, keeps the tracks in place — Ctrl + Shift + G) and Delete (the dialog names what is deleted with the group and offers Ungroup instead). Double-click the name to rename it. The Inspector of a group has Opacity and Volume faders that scale every clip in it (3.5). Step by step: Timeline Groups |
| Relink | Right-click a clip whose media is missing → Relink media… |
| Snap | On by default — press S to turn it off or on again (there is no on-screen indicator) |
| Collision | On by default — a dragged clip stops at its neighbours on the same track. Press C to turn it off, e.g. to overlap two clips for a crossfade |
| Jump to the next / previous snap point | Tab / Shift + Tab |
The right edge cannot trim a clip shorter than 1 s.
Select a clip to show its two edge handles. While an edge or a slip is being dragged, a small label next to the pointer shows the In and Out points (or the length) the drag is setting, in media time.
Thumbnail strips
A video clip shows a strip of pictures from its own media: each tile is the frame that plays at that point of the clip, so you can see where you are in a clip and trim or slip to a picture instead of to a guess. The strip follows the clip — trim its start and the pictures slide with it; a clip longer than its media shows the media again where it repeats. Still images show their picture; live inputs, generators and audio clips keep their icon or poster.
The pictures are made by the engine in the background, only for clips a Timeline is showing, and never at the expense of playback: one small frame at a time, at the lowest priority, pausing longer while a show is running. A long clip is covered roughly first and refined afterwards, and until its strip is ready a clip shows its single thumbnail.
While strips are being made, a small Thumbnails label in the Timeline's bottom bar says how far the current one is and how many clips are still waiting — "slowed while the show plays" means it is going slower on purpose. Each such clip shows a thin bar along its bottom edge: filling while its strip is made, striped while it waits its turn. Both disappear when every clip on screen has its strip. Strips are kept next to the media (in its .ep folder) and are made once per file — replacing a file with a new version makes a new strip.
The left edge trims. Dragging it inwards sets a later in-point: the clip's end stays put and the content stays anchored in time — the frame that played at a given second keeps playing at that second — exactly like trimming the head of a clip in an editing program. Dragging it back out restores the earlier frames, down to the start of the media. The same in-point is the In field in the Inspector, next to Out and Duration, so a frame-exact value can be typed instead.
Slipping changes which part of the media a clip plays without moving or resizing it: hold Alt and drag the clip's picture — drag it right to see earlier frames, left for later ones. Only the In point changes (the strip slides under the pointer), and a slip stops where the clip would run past the end of its media, so it never makes a clip repeat. A clip that already plays all of its media has nothing to slip — shorten it first.
Splitting cuts a clip in two at a moment: right-click the clip where it should be cut and choose Split clip here, or put the playhead there and press Ctrl + K. The two parts play exactly what the one clip played — the second starts with the frame that was playing at the cut — and its opacity or volume curve and its keyframes are cut with it, so a fade-out stays at the end where it was. With clips selected, Ctrl + K splits only the selected clips under the playhead; with nothing selected, every clip under the playhead. One Ctrl + Z joins them again. A clip that repeats its media keeps repeating the same section after the split: the second part continues the loop where the cut fell and wraps at the same moments as before, so its loop marks stay where they were.
Either edge can extend past the media's length: the clip then repeats to fill its whole duration — so a 10 s loop can cover a 60 s slot. The right edge does that by itself; on the left edge, hold Alt (or keep dragging once the in-point has reached the start of the media) — the clip then starts earlier and repeats, which shifts where each frame falls. When that matters, use the snap: with snapping on, an edge that is extending a clip settles exactly on a whole multiple of the media length, which keeps the content where it was.
Playhead
- Click anywhere on the ruler to jump to that time.
- Drag the playhead handle to scrub.
- The timecode display in the Transport bar always reflects the playhead position.
- While playing, the view pages along with the playhead. Pan away and the view stays where you put it until the playhead reaches that part again.
Zoom and Scroll
| Action | How |
|---|---|
| Scroll the tracks vertically | Scroll wheel |
| Zoom in / out | Ctrl + scroll wheel |
| Scroll horizontally | Shift + scroll wheel, drag the scrollbar, or drag the ruler |
| Zoom in / out | + / - |
| Fit all clips | Press F (fit to view) |
| Go to the first clip's start | Home key |
| Go to the last clip's end | End key |
| Compact / normal track height | Compact view button under the tracks, or M |
Compact view
Compact view (the button left of the zoom buttons under the tracks) draws every track as a thin row, so a long show fits on one screen. The button is lit while it is on.
While it is on, a single track can be shown full height again without leaving the compact view: click the button in the track's head (next to its visibility switch), or right-click the track and choose Show this track full height. The same button — or Back into the compact view in the menu — makes it thin again. This works for data tracks too. Which tracks you took out is kept until the page is reloaded; it is not saved in the project.
Looping
Looping is a property of the clip, not of a region of the timeline. There is no loop-in/loop-out region on the timeline ruler.
- Inspector → Loop makes a Timeline clip free-running: from the moment it starts, it plays and repeats on its own clock. Scrubbing or jumping the Timeline does not move it.
- To make a clip repeat in step with the Timeline, drag its edge past the media length instead — it repeats to fill (see Clips).
Loop on the Timeline itself (its Inspector) repeats the whole Timeline: it plays from its first clip or cue to its last clip end or cue, whichever is later, and starts again. A cue at the very end fires before the jump back (3.5).
Fades
A transition is a fade you set on the clip in Inspector → Fade — Fade to black or Crossfade (or None, or -- Use default --), with its own length in seconds. Overlapping two clips does not by itself create a transition, and the overlap does not set the fade length. See Fades & Transitions.
Cues on the Timeline
A cue is a marker on the Timeline that does something when the playhead reaches it. Cues sit on the cue line just under the ruler.
- Add a cue: double-click the cue line, or right-click it and choose New Cue — or one of the ready-made New Cue 'Pause', 'Stop', 'Play', 'Jump to Time' or 'Calibration'.
- Move a cue: drag it along the cue line.
- Previous / next cue (the transport buttons): Next goes to the cue after the playhead; Previous goes to the cue before the active one — the last cue the playhead has passed — as in a Playlist, so pressing it again keeps stepping back (3.5).
- Right-click a cue for Select All Cues, Select All Cues to Left, Select All Cues to Right, or to delete it.
Select a cue to edit it in the Inspector:
| Setting | Description |
|---|---|
| Offset | Where the cue sits on the Timeline |
| Guideline | Draw a vertical line through the tracks at the cue |
| Action type | What the cue does: Custom (runs a cue script), Pause, Stop, Play, Jump to time, Jump to Cue, Calibration (switch a screen to another calibration), Shutdown Force or Restart Force |
| Composition | Which composition the action applies to — the current one or another |
| Continue playing after jump | For a jump: keep playing from the target (on) or pause there (off) |
| Show Mode on | For Play: also switch Show Mode on when the cue fires. Off for a new cue (3.5) |
| Stop others | For Play: Don't stop others, All other compositions, or Selected compositions (tick them in the list that appears) |
| Show in Control Panel / Description | Show the cue as a button, with this text, in the Operator Control view |
| Hotkey | A key that fires the cue: F1–F12, optionally with Shift / Alt |