
Appearance
Controlling an Attraction Ride with Data Tracks
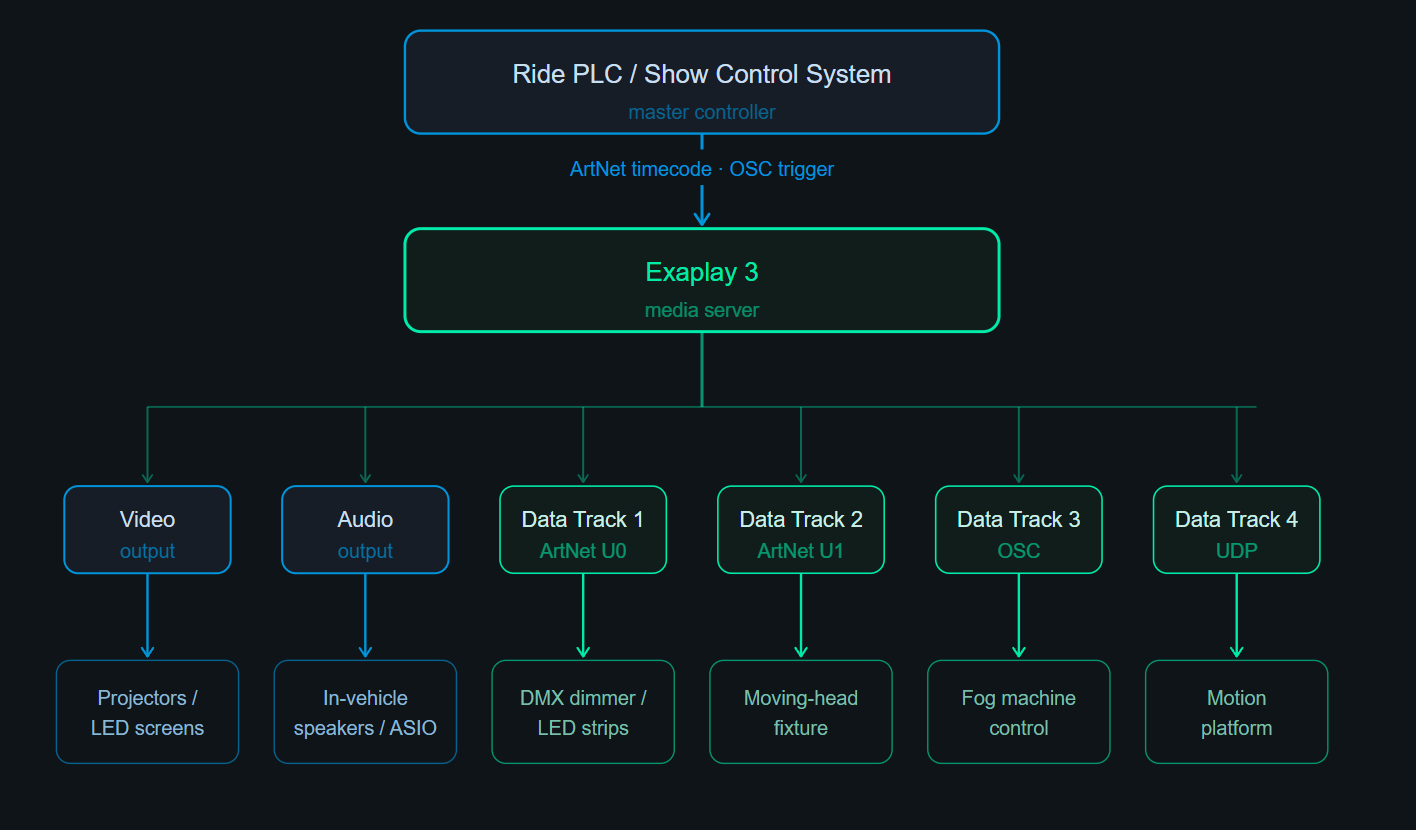
This guide covers using Exaplay 3 as the media and automation backbone of an attraction ride — a dark ride, simulator, or themed experience where video, audio, lighting, and motion effects must all play back in precise synchronisation, triggered by a ride-control system.
Typical Attraction Architecture
Part 1 — Timecode Synchronisation
The ride PLC must be the master clock. Exaplay 3 runs as a slave, locking its playhead to the incoming timecode.
Option A — OSC Timecode
- Exaplay listens for OSC on UDP port
8000by default — nothing to enable. The port is set under Menu → Settings → Communication → OSC Listen. - Open Menu → Settings → Timecode and set Timecode Mode to
Receive OSC timecode. - Set the ride composition's Inspector → Timecode Sync → Mode to
Slave <follow TC>, and switch on Auto Play on TC and Auto Stop on TC Loss (see the safety note below). - The show control system sends
/timecodewith the time as its argument — seconds (f/i) or the string"HH:MM:SS:FF". See OSC Timecode.
Option B — LTC (Linear Timecode)
- Connect the LTC audio signal to an input on the ASIO audio interface.
- Open Menu → Settings → Timecode and set Timecode Mode to
Receive LTC, Linear Timecode. - Set the composition's Timecode Sync exactly as in Option A, step 3.
- Pick the Input Channel, match the frame rate to the PLC, and confirm lock (details: Receive: LTC).
Safety note: For a live attraction, Exaplay must follow the ride, never free-run ahead of it. A slave mode alone does not do that. You need all three:
- a slave Timecode Mode (OSC Timecode, LTC, MTC or Art-Net Timecode),
- the composition's Inspector → Timecode Sync → Mode set to
Slave <follow TC>(or Slave with Offset), and- Auto Stop on TC Loss switched on in the same section — it is off by default.
With Auto Stop on TC Loss on, Exaplay keeps running for the Freewheel Time (Menu → Settings → Timecode → Chase Settings, default 2 s) after the last timecode arrives and then pauses on the current frame. With it off (the default), a playing composition keeps running on its own clock after the PLC stops sending timecode. Switch on Auto Play on TC as well, so playback resumes by itself when timecode comes back.
Part 2 — Building the Show Timeline
With timecode sync active, build the full ride experience as a single composition with all elements locked to the ride's timecode:
Timecode    00:00:00:00 ──────────────────────── 00:05:00:00

Track 1 (Video)    [Pre-show intro] [Main ride sequence] [Ending]
Track 2 (Audio)    [Soundtrack + dialogue                        ]
Track 3 (Data)     [DMX dimmer keyframes                         ]
Track 4 (Data)     [Moving head position                         ]
Track 5 (Data)     [Fog trigger                                  ]
Track 6 (Data) [Motion platform keyframes ]Setting Frame Rate
Make sure the project frame rate matches the ride's timecode:
- Open Menu → Settings → Timecode → Framerate.
- Set to 30 fps (typical for rides with SMPTE timecode) or 25 fps (PAL systems).
Part 3 — DMX Lighting Control via Data Tracks
Each lighting channel becomes one Data Track targeting an ArtNet universe and channel.
Example: Ride Scene Lighting
Scene:  "Cave 1" entrance (0:30 → 0:45)
Goal:   Dimmer fades from 0 to 80%, strobe flashes, then fades out

Data Track "Cave1_Dimmer":   Universe 0, Channel 1
  keyframes:  0:30:00 → value 0
              0:35:00 → value 80
              0:40:00 → value 80
              0:45:00 → value 0

Data Track "Cave1_Strobe":   Universe 0, Channel 2
  step interpolation (immediate jumps):
  keyframes:  0:38:00 → value 255  (strobe on)
              0:38:15 → value 0    (off)
              0:38:22 → value 255
0:38:30 → value 0Step-by-step
- In the Timeline, right-click the empty dropzone area and choose Add Data Track (or click the caret ▾ next to + under the track list → + Data Track).
- The new track is selected. In the Inspector, set:
- Name (the title at the top):
Cave1_Dimmer - Min Value:
0, Max Value:100— so a keyframe value is a percentage (80 → DMX 204). With the default range 0 – 1, every value of 1 or more sends full 255. - Format:
ArtNet - Address:
192.168.1.50(your ArtNet node / dimmer) - Universe:
0 - Channel:
1
- Name (the title at the top):
- For the strobe track
Cave1_Strobe, set Min Value0, Max Value255(so the values are raw DMX levels), InterpolationStep, and Channel2. - Double-click the track's curve area at
0:30:00to add the first keyframe, and set its value to0in the Inspector. - Add more keyframes at each timecode where the value changes.
- Repeat for each DMX channel.
See ArtNet & DMX Output for packet format and multi-universe details.
Part 4 — OSC Control for Practical Effects
For effects that don't use DMX — fog machines, pneumatics, water effects — use OSC output Data Tracks to trigger the effect controller.
Example: Fog Machine at 01:10:00
Data Track "FogMachine":   Format: OSC
  Address:   192.168.1.60
  Port:      9000
  OSC Path:  /fog/trigger

  keyframes (step interpolation):
  01:10:00 → value 1   (trigger ON message)
01:10:05 → value 0 (trigger OFF message)A Data Track streams its value continuously while the composition plays — it does not send one message per keyframe. The effect controller receives /fog/trigger 1.0 over and over (up to Rate (Hz) per second, default 120) from 01:10:00, then /fog/trigger 0.0 from 01:10:05. Lower Rate (Hz) if the controller should not be flooded. To send one message at a moment, use a Timeline cue with Action type Custom and an OSC> line instead (see Show Control Integration).
Part 5 — UDP to Motion Platform
Some motion platforms accept a simple UDP packet containing a float value for each axis. Use a UDP Data Track per motion axis:
Data Track "MotionPitch":  Format: UDP
  Address:  192.168.1.70
  Port:     9500
  Min Value -1, Max Value 1

  keyframes:
  00:30:00 → value 0.0
  00:31:00 → value 0.8   (nose up)
  00:32:00 → value -0.3  (nose down)
00:33:00 → value 0.0 (level)The UDP datagram contains the value as a 4-byte big-endian float. Check your motion platform's documentation for the expected packet format.
Part 6 — Emergency Stop and Safety Interlocks
In a live attraction, the ride PLC is responsible for safety. Exaplay 3 must respond correctly to emergency events:
PLC Stops Timecode → Exaplay Freezes
Only with Auto Stop on TC Loss switched on (composition Inspector → Timecode Sync; off by default): when the incoming timecode stops, Exaplay keeps running for the Freewheel Time (default 2 s), then pauses and the picture holds on the current frame. With Auto Play on TC on as well, playback resumes and chases to the correct point when timecode comes back.
With the defaults (both off), a playing composition does not stop when the PLC stops sending timecode — it keeps running on its own clock.
E-Stop Cue
There is no single "stop everything" cue action — the Stop action stops only the cue's own composition. Build the E-STOP like this:
- Add a cue named
E-STOPwith Action type Play, Composition set to a black (empty) composition, and Stop others set to All other compositions. If your show needs something else, use Action type Custom with the script lines it needs. - In the cue's Control Panel section, give it a Hotkey such as
F12, or wire it to a dedicated button on the operator's control hardware.Escapecannot be assigned — pressing it while capturing clears the Hotkey field.
A PLC can also stop all compositions directly, without a cue: POST /stop over HTTP or /exaplay/global/stop over OSC.
In a real installation, the PLC should also be able to trigger the E-STOP cue over HTTP:
bash
# PLC sends:
POST http://192.168.1.5:8123/cue/trigger
{"name": "E-STOP"}Over OSC, /cue accepts the cue's index or its name within one composition (addressed by ID or by name); the HTTP endpoint above is the one that searches all compositions for a cue name:
/exaplay/comp1/cue "E-STOP"
/exaplay/Main_Show/cue "E-STOP"Part 7 — Operator Monitoring
During ride operation, the technical operator watches Control → Monitor and the Diagnostics Panel:
| What to watch | Where |
|---|---|
| Timecode lock status | Control → Monitor → Timecode: the IN card shows receiving and locked |
| Engine FPS (must stay at project frame rate ±1) | Diagnostics Panel |
| Data Track transmission events | Monitor → Network Traffic |
| ArtNet output confirmation | Monitor → Network Traffic (one ArtNet row when a track starts sending to a destination, one when it stops — not a row per packet) |
| OSC output confirmation | Monitor → Network Traffic (OSC messages listed) |
If the track's ArtNet row appears in Network Traffic (and its Live value moves) but the fixture doesn't respond, the issue is in the DMX cabling or fixture configuration — not Exaplay.
Part 8 — Robustness for Daily Operation
Attraction rides typically run 10–14 hours per day, 7 days a week. Configure Exaplay for maximum resilience:
Auto-Heal
Auto-Heal is on by default (Menu → Auto-Heal & Watchdog); it saves the playback state every 2 seconds. Auto-Heal alone does not bring a crashed engine back: also switch Watchdog Restart on in the same dialog — it is off by default. Then a crashed or hung engine is restarted, and Auto-Heal restores the correct position and resumes.
Ride Cycle Scheduler
Use the Scheduler to reset the show to timecode 00:00:00:00 between ride cycles if the PLC does not send a hard reset:
- In Control → Scheduler, add an item with Action Type Cue →
Reset, switch Repeat on, and set Repeat interval to Every N minutes (Ride Cycle) with the cycle length. Better still, have the PLC fire theResetcue itself withPOST /cue/triggerat the end of each cycle — a fixed interval drifts against a ride that waits for guests. - The
Resetcue jumps the timeline to the beginning and pauses, waiting for the next timecode sync (OSC/LTC) from the PLC.
Nightly Restart
Add a Scheduler item at 03:00 with Action Type System → Restart system (reboots the PC), repeating daily — or switch on Menu → Auto-Heal & Watchdog → Scheduled Reboot with Reboot Time 03:00. This clears any accumulated memory fragmentation from a full day of operation.
Summary Checklist
- [ ] Timecode Mode set to a slave mode; composition Timecode Sync set to Slave
- [ ] Auto Stop on TC Loss switched ON (off by default) and Auto Play on TC ON; tested by stopping the PLC timecode
- [ ] TC lock verified in Control → Monitor → Timecode (receiving, locked)
- [ ] Project frame rate matches the ride's timecode standard
- [ ] Video and audio tracks built and synced to timecode
- [ ] Data Track created per DMX channel (Format ArtNet, Universe/Channel and Min/Max Value configured)
- [ ] OSC Data Tracks created for practical effects
- [ ] UDP Data Tracks created for motion platform axes (if applicable)
- [ ] E-STOP cue created, with a Hotkey (not Escape) and a remote control command; PLC can also send
POST /stop - [ ] Auto-Heal on; Watchdog Restart switched ON (off by default)
- [ ] Nightly restart scheduled
- [ ] Operator monitoring: TC lock, FPS, Network Traffic confirmed healthy