
Appearance
The Stage
The STAGE tab is where a show meets the hardware. It holds three kinds of things, and everything on the tab is one of them — plus the PCs the outputs are plugged into:
| Thing | What it is |
|---|---|
| Screen | A picture your show composes — a wall, a dome, an LED strip. It has its own canvas at its content resolution. |
| Field | An additional area on a screen with content of its own — a logo, a picture-in-picture, a ticker. Most shows need none: content dropped on a screen fills it. A track, a composition or a clip plays on a screen or on a field, never on a projector. |
| Output | A real exit for pixels: a monitor, a projector, an LED processor input (on this machine or on a client machine), or an NDI stream. An output shows the screen assigned to it — nothing else. |
| PC | A machine of the rig — this one, and every client paired to it. Its outputs hang above it. |
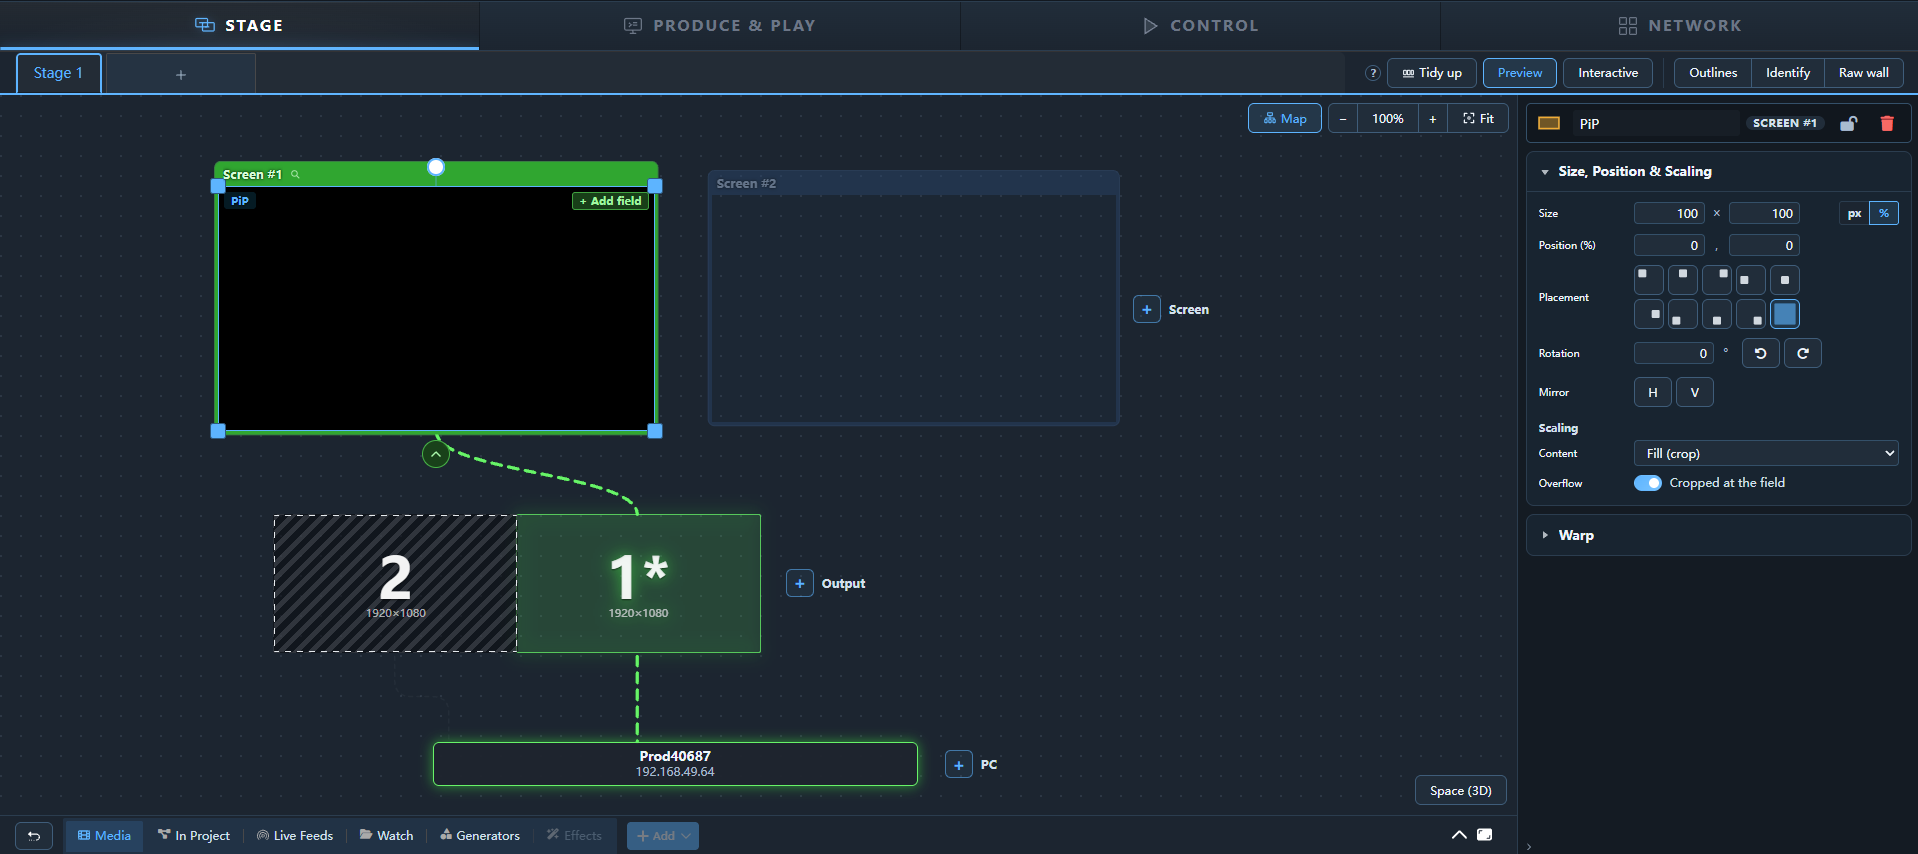
The show canvas is where the outputs are laid out side by side; each output renders the slice of its screen that it sits under. The concepts are explained in full in Output Setup; this page is the tour of the tab itself.
Walkthrough
☰ menu → Walkthroughs → Outputs & projection → Assigning outputs to screens plays the whole flow on a two-machine rig, recorded from the real Stage.
Walkthrough
☰ menu → Walkthroughs → Outputs & projection → Working on the Stage — screens, content and the wall adds a screen and gives it a colour, drops a generator onto a field, switches on Outlines, tidies up the screen cards and splits an output into two cells.
Layout
The tab has three parts:
- The canvas — one zoomable workspace that draws the working tree (below). The band above it carries the stages on its left — one tab each — and the switches on its right; the zoom sits on the canvas itself, top right, next to Fit. With Debug Mode on, the Space (3D) button sits at the canvas' bottom right.
- The inspector on the right — the settings of whatever is selected: a screen, a field, an output or a PC. Only one thing is selected at a time. With nothing selected it shows the overview.
- The content browser under the canvas — the same browser as in Produce & Play, folded to a bar until you open it. Drag content from it onto a field (see Content onto a screen).
Stages
A stage groups part of your rig: its screens, and the PCs whose outputs show them — a main hall and a foyer, say. Each stage is one tab in the band above the canvas, and the canvas shows only what is on the open stage.
- The first stage is home. It shows every PC of the rig and every screen that is not on another stage, so a show with one stage looks exactly as before. It cannot be deleted or moved; you can rename it, colour it and switch it off. Every stage — home too — takes screens from the others: Move a screen here… on its empty canvas or in its inspector.
- + adds a new stage. It starts empty: add a screen (it is created on the open stage), or pick Move a screen here… to bring one over from another stage. A screen's inspector also has a Stage choice.
- PCs on a stage. Open a screen and click + at the end of the PC row: From this rig lists the PCs that are not on this stage yet. A PC can be on several stages; each of its outputs shows one screen. A PC also appears by itself as soon as one of its outputs shows a screen of the stage. Remove from this stage in the PC's inspector takes it off again (outputs that show this stage's screens are taken off them — it asks first). The PC stays in the rig.
- An output is never used twice. An output that shows a screen of another stage is drawn faded, with that stage's name on it. Assigning it here takes it from there — the question and the drop hint name the stage.
- Switched off. The power button in the stage's inspector (or a right-click on its tab) switches a stage off: its screens show nothing on the wall, on every PC — their content is not played, decoded or heard. Exaplay asks first. The tab is crossed out; Switch on brings it back at once.
- Deleting a stage (the ✕ on its tab, or the trashcan in its inspector) deletes its screens and their fields. Its PCs and outputs stay in the rig; the outputs its screens used become free. A composition that played on one of those fields is marked with an orange ! in Produce & Play (see Composition Area) — the same as after deleting a single screen.
- Undo. Every change to a stage — and adding or deleting a screen — is undone with Ctrl+Z, also from another tab. A deleted stage comes back with its screens, their fields and their content; outputs are given back where they are still free.
Click a tab to open its stage; its inspector shows its name, colour, power button and delete. Drag a tab, or right-click it, to reorder. On a client machine the tabs switch stages, nothing else.
The working tree
The canvas is one tree with three levels, top to bottom: screen → its outputs → the PCs they are plugged into.
All screens
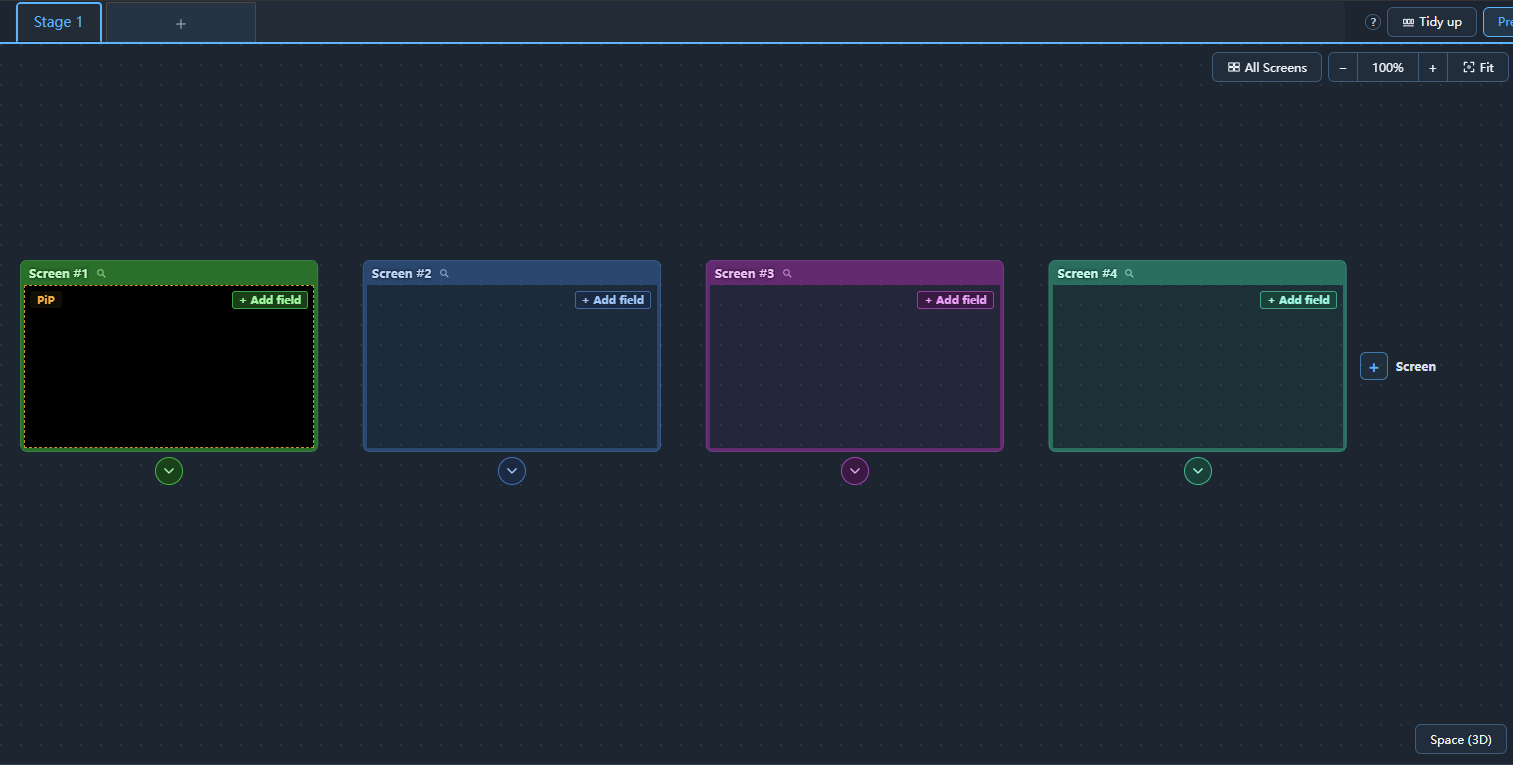
At the start every screen sits side by side as its own card: its canvas at its content aspect with its border all the way round, its name in a bar across its top, and its additional fields (if it has any) as dashed boxes. Each screen wears its own colour (pick one in the screen's inspector); on the selected screen the frame and the title bar turn brighter, in the screen's own colour.
- Click the card (or its name) to edit the screen — an additional field on it takes its own click.
- Drag the card to move it — arrange the screens as they stand in the room. The arrangement is saved with the show; nothing on the wall changes.
- + Add field in the card's top-right corner adds an additional field to it — a centred half of the screen, on top (a small + when the card is small). Every other + of the tree says beside it what it adds — + Screen, + Output, + PC.
- The + Screen after the last card adds a screen. With no screen yet the canvas says No screens yet with + Add a screen.
- The round ⌄ under a card opens that screen (below). A red ⚠ beside it: a PC of that screen has changed monitors — click it to go straight to that PC.
One screen open — its outputs and PCs
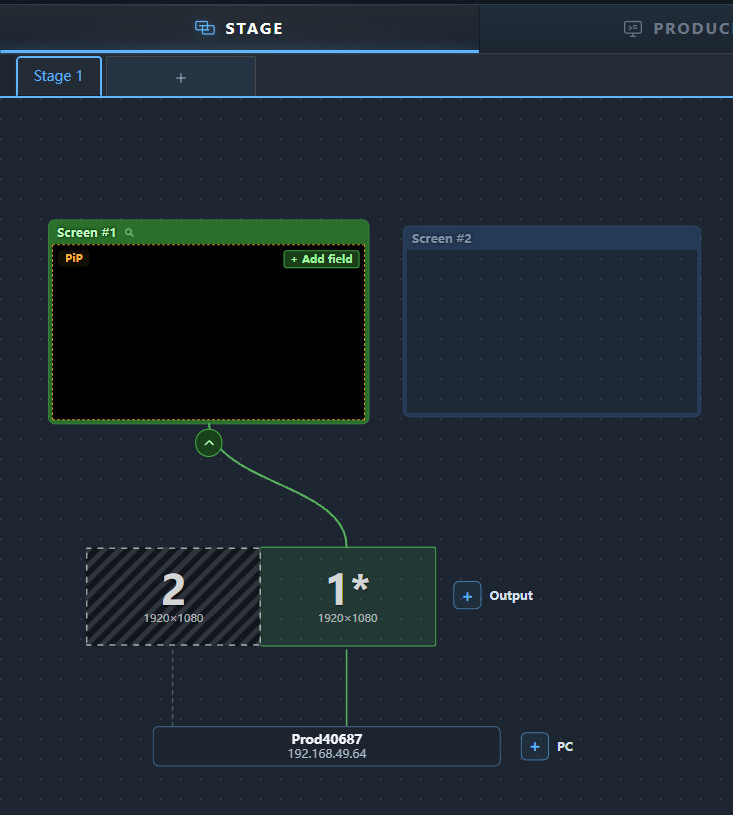
The ⌄ under a screen opens its tree: the view zooms to that screen, the other screens stay small beside it, and under it you see the outputs, grouped per PC at their real position on the show canvas, and under each group the PC itself (its name and address). Only one screen is ever open — opening another closes the first — a click on one of the small screens beside it opens that one. The round arrow under the open screen, or All Screens in the view toggle, closes it again.
Every PC of the rig is in the tree, always in the same order. A PC that shows nothing of the open screen is drawn dimmed, so its outputs are still there to set up and to assign. Lines connect each output to the screen it shows and to its PC.
| What you see | Meaning |
|---|---|
| Solid box in a screen's colour | An output assigned to that screen — it shows content. Hover it for its name, its resolution and the screen. |
| Dark box hatched with diagonal stripes, a bright dashed edge | No screen assigned — this output stays dark. |
| A box divided into numbered cells | A split output. Each cell is tinted in the colour of the screen it shows. |
| A number on a box | The output's number on its PC (cells read e.g. 2,1). A * after it (1*, 1*,2) marks the Windows primary monitor. Hover for its name and resolution. |
| A faint VIRTUAL behind the number | A placeholder output — added with + Output as a Placeholder, not a monitor the PC detects. |
| A machine name on a box, · offline | A client's output; the machine is not reachable right now. Its outputs and assignments are kept. |
| ⚠ and a resolution (or moved) on a box | The monitor reports something different from the stored output — see When the monitors change. Click it to open the PC, where it is repaired. |
| A red ⚠ beside a screen's ⌄ | A PC in that screen's tree has changed monitors. Click it to open the tree on that PC. |
| NDI box | An NDI send of that PC: a rectangle at its resolution, to the right of the PC's monitors, with its name and size. Rounded corners and a faint NDI behind the name tell it from a monitor. Dashed and grey: no screen assigned — it sends nothing. A red edge: the engine reports that it is not sending. |
| No monitor detected | A PC that reports no monitor. |
| A + B overlap … px · Blend on the open card | Two of its outputs overlap and do not both blend yet — click to switch the edge blend on for both, widths from the layout. |
| VIOSO's mark on a screen card | The screen has a VIOSO calibration; a dot in front of it means it needs a look. Hover it for the file; click it to select the screen — its Calibration card opens with it. |
| A small scaled mark with a size (2880×1800) in a screen card's title bar | The screen's content resolution is not its outputs' size, so the whole canvas is fitted onto the outputs — scaled, and distorted where the aspect ratios differ. The size is the outputs'. Hover it for the details, click it for the screen's Canvas card. See A screen. |
| A frame headed by VIOSO's mark and the file around outputs, a test image on each | The open screen's calibrated outputs, standing where their channels sit in the calibration; each shows its channel's test image through warp and blend, as in the assign tool. The screen card itself shows the raw content. See Projection Mapping. |
Hover a screen, an output or a link and its chain lights up: the screen, the outputs that show it, the links and the PCs they run into. A selected screen, field or output keeps its chain lit; a click on empty canvas lets go of the selection.
Assigning: connect an output to a screen
Assignment is drawn on the canvas or picked in the inspector — every way below writes the same assignment, and is saved at once:
- Drag an output onto a screen. Drag any output box up onto a screen — the open one, or one of the small screens beside it — and drop it there: the screen lights up and reads Drop to show …, and the output shows that screen from then on. A split monitor works the same way: drag one cell to assign that cell alone, or drag the monitor by its edge to put every cell on the screen. Dropping an output on the screen it already shows (Already shows …) changes nothing. A drag that ends anywhere else just arranges the outputs (below).
- Drag a screen onto an output. Carry a screen card down onto an output of the open tree (Drop to play on …). The card goes back to its row. On a split monitor the drop lands on the cell under the pointer; the top-left corner of the monitor (a small area, not the very pixel) puts the screen on every cell — a line drawn from the screen's port works the same way.
- Draw a link. Hover a screen and its port — a small ring — appears in the middle of its bottom edge; hover an output and the same ring appears on its top edge. Drag from either to the other end. An assigned output's line let go on empty canvas releases it. Esc cancels the line.
- Cut a link. Hover a line between a screen and an output: it wears an × — click it to take the output off that screen (it stays dark).
- In the inspector: the output's Assigned screen (a split output's Assigned screens, with All cells), or the screen's Output Assignment list.
If the output already shows another screen, Change the assignment? asks first — … is assigned to …. Want to change the assignment to …? — with Change assignment and Cancel (Enter changes, Esc cancels). The inspector's pickers and the screen's Output Assignment list ask the same question.
Arranging the outputs
Inside a PC the outputs sit where they are on the show canvas. Drag one to arrange it — it works like the display settings in Windows:
- The monitors of a PC always hang together. Edges snap, an output dropped mostly over another swaps places with it, and a smaller overlap sets it beside it. Let go of a monitor anywhere else — even far away — and it snaps back against the nearest edge of another monitor of the same PC. Pull a monitor out of the middle of a row and the others close the gap.
- Placeholders snap to nothing. A placeholder output stays exactly where you let go of it, and a small invisible gap always keeps it apart from the monitors — so the outputs that stand alone are the placeholders and NDI boxes, which you can tell at a glance.
A drag never overlaps two outputs. To overlap two projectors — for an edge blend — type the overlap into the Overlap & Blend card of either output (see An output).
The outputs of a screen with a VIOSO calibration are not arranged this way: they keep their output order, inside a frame named after the file. Drag one (or a cell) onto another output of the same calibration and it only reassigns calibration channels, exactly like a drop in the assign tool: the two outputs trade their parts of the calibration (the pictures change places, the outputs stay), and one without a channel takes the other's. The arrangement and the Windows layout never change; dropped anywhere else, the output goes back. See Projection Mapping.
The drop is saved (on a multi-client rig, sent to the fleet). A cell of a split monitor can be dragged on its own; drag the monitor's edge to move it with all its cells. Whether the wall follows the arrangement depends on the screen's Alignment — see Arranging the outputs.
Moving things on the canvas
Screen cards, PCs and NDI boxes can be dragged anywhere within their own level. None of it changes the wall.
Screen cards — arrange them as the screens stand in the room: side by side, above each other, each in its own shape. The arrangement is saved with the show, so everyone who opens it sees the same room, and Fit frames it whole.
PCs and NDI boxes — moved to make the picture readable; kept in this browser. An NDI box never snaps to the PC's monitors: it stays where you let go of it — and dropped on or right against a monitor, it is pushed off by the same small gap a placeholder keeps.
Marquee: a left drag on empty canvas draws a selection rectangle; everything it touches is selected (Ctrl, Cmd or Shift adds to the selection). Drag any selected element and they all move together, their distances kept. A PC's outputs move as one group. Esc clears the selection.
Tidy up in the header puts every screen card, PC, output group and NDI box back in its row — and in an open tree, the outputs of a screen aligned As in Windows back where their machines put them. With screen cards arranged it asks first: the room is saved with the show, so tidying it up changes it for everyone. Outputs of a screen set to Rearrange keep their place: that arrangement is where their picture goes.
One screen large — the field editor
Double-click a screen card (or click the icon beside its name) to work on it large: that screen alone, centred, with its fields. The view is fixed here (no zoom or pan). Back at the canvas' top left (or Esc) returns to where you came from.
Additional fields
On every screen card:
- Click a field to edit it; drag it to move it; the corner handles resize, the handle above it rotates.
- A field with its warp switched on shows its grid points (see Field warp).
- A hidden field (eye) or a locked one (lock) carries the icon in its name. A locked field is not moved or resized by a drag.
- A field on Keep resolution wears its name where its Align puts the picture — top left, the middle, bottom right and so on.
The view toggle
The button left of Fit in the canvas' top-right corner switches between two views: All Screens (every screen, closed) and Map (one screen open with its outputs and PCs). Its word names the view you are in, and its tooltip says where the next press goes. From All Screens it opens the selected screen (or the selected field's screen), else the first one. The field editor is not one of its steps: it has its own Back. Fit frames whatever view you are in.
The Stage remembers the view you were in: switch to Produce & Play (or any other tab) and back, or reload the page, and it opens in the same view again. Only loading or creating a different project starts on all screens.
Content onto a screen
The bar at the bottom of the Stage is the content browser — the same one as in Produce & Play (Media, In Project, Live Feeds, Watch, Generators). It starts folded; the arrow on its right opens it, the square beside it makes it tall, and its top edge can be dragged. Folding it here does not fold the one in Produce & Play.
Drag a file, live feed or generator onto a screen card — or onto an additional field on it. The card (or the field) lights up under the pointer, and when you let go a dialog shows where the content can go. One click puts it there and plays it at once, and the Stage turns its Preview on so you see it. Closing the dialog changes nothing.
- No playlist or timeline yet: click Playlist or Timeline. A new one — Playlist #1, Timeline #1 and so on — is created with the content in it, on that screen (or field), with Loop on — it keeps playing until you stop it.
- There is one already: every playlist and timeline is listed, each marked as one or the other. New: Playlist / Timeline under the list creates another one, also with Loop on. Adding to an existing playlist or timeline leaves its Loop as it is.
- A playlist: click it. The content is added at the end and that entry plays. A playlist plays on one screen (or field) as a whole. If it has none, or already plays here, that is all. If it plays somewhere else, the dialog asks whether to move the playlist here — that moves every entry of it. No goes back to the list and changes nothing.
- A timeline: point at it (or click it) and its tracks open below it; click a track, or New track. The content goes on the track after what is already there, the timeline's playhead jumps to it and the timeline plays. Each track plays where it is set to: a track without a place, or a new track, takes this one; a track playing somewhere else is moved only after you say yes (No goes back to the list).
Double-clicking an item in the Stage's browser adds nothing — the place is always chosen by dragging. A folder or an effect cannot be dropped on a screen (an effect goes on a clip, in Produce & Play).
A VIOSO calibration (.vwf) is listed in the Stage's Media tab too. Drag it onto a screen card to load it on that screen — or onto an output, to load it on the screen that output shows. See Projection Mapping.
Adding PCs and outputs
With a screen open, the tree has two more + buttons:
- + after the last PC — Add a PC. It lists the Exaplay machines this network sees that are not in the rig yet, each with its address and state (standalone, master, client of another rig, not answering), and Add by IP for one on another subnet. Scan looks again. Add pairs that machine as a client of this one, after a confirmation; if no machine is the master yet, it asks to make this machine the master first. If another machine is already the master of this network, pair the PC from that machine's interface. It is the same pairing as on the Network tab.
- + beside a PC's outputs — Add an output. On this machine it opens Add output for an NDI stream or a Placeholder (an output that is not a detected monitor). On a client PC only an NDI send can be added from here: a client's monitors are the ones it detects itself. Select such a send to rename it, change its NDI name or delete it with the trashcan in the head row — the change is written to that PC and saved in the show, so the send comes back after the PC reloads the show. (Deleting needs the PC online.)
Moving around
| Action | How |
|---|---|
| Zoom | Mouse wheel (about the cursor), or − / + next to Fit on the canvas |
| Pan | Drag with the right mouse button, or Alt + drag, or the middle button. The view can never be pushed out of the picture. |
| Fit everything | Fit in the canvas' top-right corner, or the % beside it |
Names and badges keep their size at any zoom. On a large rig a small box shows only its tint; hover, drag or select it to see its name. The + buttons hide when zoomed far out.
The header
The buttons come in three groups: what changes this view (Tidy up, Preview), what acts on the wall — the group is labelled so — (Outlines, Identify, Raw wall), and Undo output change.
| Control | What it does |
|---|---|
| ? | The legend and the gestures, on screen. |
| Tidy up | Puts moved screen cards, PCs and NDI boxes (and, in an open tree, the outputs of an automatic screen) back in their rows — asking first when the screen cards are arranged, since that arrangement is saved with the show. See Moving things. Greyed out when everything already stands in its row. |
| Preview | Draws the engine's live picture into every screen card, under the fields. On by default (each browser remembers your choice); off costs nothing. On, it opens one small stream per screen from the engine you are connected to. In a multi-client rig every PC sends only its own part — what its outputs show — so a card shows what reaches the outputs, black where no output shows the screen; outputs only · show live on the card switches it to the screen's whole picture, which this PC then decodes for the preview until you click stop. A screen that cannot stream for a moment shows no preview · retrying. |
| Outlines | Draws every screen's box and every field's box, with their names, on the real outputs. |
| Identify | Labels every output on the real wall with its name, its machine, its resolution and its calibration channel. |
| Raw wall | Shows the outputs without their calibration — on a multi-client rig every machine's, with no VIOSO, no warp, no edge blend, no black level — so you see what the projectors really get. NDI and masks stay; nothing in the project changes. While it is on the button is amber and the top bar of every tab shows Raw wall ON next to SHOW and BLANK; click either to calibrate again. Greyed out until the engine has reported the switch. |
| Undo output change | Writes back the output list as it was before your last change to it (assignment, delete …). Shown once you have changed it in this tab. |
Outlines and Identify reach every machine of a multi-client rig and are never saved into the show. Both draw over live content — switch them off before going on air.
Raw wall reaches every machine of a multi-client rig the same way: switched on the master, every client shows its outputs raw too, and a client that restarts or reloads its show follows the master again within a second. If a client has not followed (an older version, or a machine the master cannot reach), the button says so: it carries a ! and its tooltip names the machine. Unlike Outlines and Identify it leaves the wall uncalibrated for as long as it is on, which is why it stays visible in the top bar on every tab. Loading a project and restarting the engine both turn it off.
The inspector
What it shows depends on what you selected. Each starts with a head row — the name, which you edit right there for a screen, a field or an output.
The overview
With nothing selected — after a click on empty canvas, or on a stage's tab — the inspector shows the overview of the open stage. Its head row is the stage: its name, its colour, its power button and its delete (see Stages). Below it: a count (… screens · … PCs · … of … outputs in use), then every screen of the stage with the outputs that feed it as PC / output pills, then Free outputs, the outputs that show screens On other stages (each with that stage's name), and — if any — outputs that name a screen no longer in the project (Unknown screen). Click a screen to select it, a pill to open its output; the × on a pill takes that output off the screen.
A screen
The colour square at the end of the head row is the screen's colour. Click it to pick one of the swatches or a custom colour. The screen's frame, its outputs and its lines in the tree all change to that colour, and Outlines draws the screen in it on the wall. Automatic gives the screen its own colour from the Stage again.
Stage — with more than one stage, the stage the screen is on. Pick another to move it there, with its fields; its outputs keep showing it (see Stages).
Canvas comes first:
- Content resolution — follows the assigned outputs by default (the fields are empty, a grey placeholder shows the current size). Type a size and it stays, whatever is assigned; empty both fields to follow the outputs again. A typed size that is not the outputs' size is fitted: the whole canvas is scaled onto the outputs, distorted where the aspect ratios differ. The screen's card then wears a small mark with the outputs' size (hover it for the details); empty both fields to set the content resolution back to the outputs' size. Or keep the distortion: it is your choice. Only a gap between outputs arranged apart is on no output — the screen's card hatches it. Under a VIOSO calibration or an LED map nothing is fitted: they map the content themselves.
- Whether the outputs are arranged as in Windows or by hand is the Alignment — at the top of the screen's Output Assignment, and the same dropdown under each of its outputs' Assigned screen (see An output).
Then Content on this screen: Content (Fit, Fill (crop), Stretch, Keep resolution), Overflow for Fill and Keep resolution, Align for Keep resolution, and Mirror / Rotate in one row — H / V and the two arrows that turn the content by 90° (rear projection, a ceiling mount, a display on its side; a clip with its own size and position turns with it). There is no size or position here: the screen's size is its content resolution; a clip gets its own size in Produce & Play, an area of its own is an additional field.
Below: Fields (open, also while the screen has none — the field list and + Add field), then folded Output Assignment (the screen's Alignment, then every output of the rig; click one to assign or release it), Calibration under the VIOSO and domeprojection marks (the VIOSO calibration: Load…, or the loaded file as a pill — its name picks another file, ⟳ reads it again, × removes it, its date and size under it with a folder icon for Explorer — then its Status, Edit… for its channels and black level, and Assign again (the wand) that puts the channels on the outputs again), Content Mask, Warping (Manual Warping — the Projection Setup editor — and, with Debug Mode on, Point-Based Warp (3D); both off while a VIOSO calibration is loaded, which warps the screen itself), with Debug Mode on LED Mapping (cabinet arrays for an LED processor — see LED Mapping) and Advanced Parameters. The trashcan at the end of the head row deletes the screen. See Projection Mapping.
A screen's additional fields as layers
A screen's inspector lists its additional fields in the Fields card — every field of the screen, top one first (the top one renders on top); the screen's own content is below them all. From a field, the screen's name in the head row takes you there. Each row shows a small picture of where the field sits, its name and its size. Click a row to edit that field, even one hidden under another, without moving anything on the canvas; drag a row onto another to change the layer order. Each row has an eye (hide the field on the output — the clips routed to it keep playing, sound included) and a lock (the field's position, size, rotation and warp cannot be changed until it is unlocked).
An additional field
The first card is Size, Position & Scaling — size and position (in px or %, the toggle at the end of the Size row), a Placement grid, Rotation (an angle, or the two arrows for 90° steps — grey while the angle is not a multiple of 90°), Mirror (H / V) and how content is scaled into it — and a Warp fold (its Polar / Spherical (dome) layer only with Settings → System → Debug mode on). The screen's name in the head row selects the screen; the lock beside it locks the field (its position, size, rotation and warp cannot be changed; the scaling stays editable) and unlocks it again; the trashcan deletes the field.
Drag content from the browser onto the field to start a playlist or timeline on it; play it in Produce & Play or on the Control tab.
See Additional fields.
An output
The head row holds the output's name, its In show switch and, at its end, the trashcan that deletes the output. Deleting a monitor Windows reports only takes it off the Stage — it stays connected, and Refresh on its PC's Outputs card brings it back (see A PC). Below it come up to five cards:
Assignment — what this output shows. Columns and Rows first (not on an NDI send), then the assignment under them, so a click on + never moves the steppers: Assigned screen for a whole output (the × beside it takes the output off its screen), or for a split output All cells and one picker per cell, laid out like the cells. For an NDI send also its NDI name and a Status line from the engine. Under the assigned screen(s), Alignment — where the output's picture comes from on its screen, one of:
- As in Windows (the default, no alignment) — the outputs are read 1:1 from each machine's Windows display arrangement, machines left to right. A change made in Windows reaches Exaplay with Refresh on the PC (or an engine restart).
- Rearrange — drag the outputs on the Stage into any order: one dropped over another swaps places with it, and a PC's monitors stay edge to edge (no gaps).
- VIOSO Calibration — the screen has a VIOSO calibration, whose channels follow the output order. While it does, As in Windows and Rearrange are not offered — remove the calibration to arrange the outputs freely. Picked on a screen without a calibration, it opens the calibration's Load… dialog.
The choice applies to every output of the screen(s) this output shows; the tooltip names them.
Hardware — what the machine reports, rarely changed: Type, Render resolution (locked to the monitor's own mode; click the lock to render another size, e.g. an LED wall smaller than its sender card's mode — Use detected size goes back) and Desktop position.
Overlap & Blend — only when the output touches or overlaps another output of its screen: one block per neighbour with the Overlap in px and an Edge blend switch; the row's tooltip names the neighbour (With Beamer L (left)). Type an overlap and this output moves over its neighbour by exactly that (↑ / ↓ nudge it 1 px, Shift 10, Ctrl 100); 0 px puts two outputs edge to edge. Edge blend blends both outputs of the seam over the overlap and switches both off again; typing an overlap never switches it on. See Edge blend.
Calibration — under the VIOSO and domeprojection marks, the same as the screen's card. The calibration of the screen the output shows, with the screen card's rows: Calibration (Load…, or the loaded file as a pill with ⟳ and ×; a
.vwfdropped on the row loads too) and Status (Edit… opens the calibration's dialog, Calibration ‹screen›, with the channel each output draws and the black level; the wand, Assign again, puts the channels on the outputs again). With Settings → Debug mode on, then the domeprojection ProjectionTools channel (the channel number the PatternGenerator protocol of ProjectionTools uses for this output; empty = numbered by position). An output whose cells show several screens has one set of rows per screen, labelled with the screen's name. A client's output carries the ProjectionTools channel only, so it has this card only in Debug Mode.Color correction (not on an NDI send) — red, green, blue and master trim at the very end of the chain, where a projector's own menu acts; 100 % is untouched, so match a wall by trimming the brighter projector down. On a split output it applies to every cell. Reset to 100 % removes the trim. The closed card shows the trim.
A card opens by itself when you select an output on which one of its settings is in use (a trim, an assigned channel, a size override); after that it stays as you left it while you edit.
A client's output carries the machine's name as a badge in the head row, next to In show, and the same cards follow; Hardware also names the Host and shows the desktop position read-only (the client detects it). A client's monitor keeps the name its machine gives it; a send on a client is renamed here, and only a send has the trashcan.
Which calibration channel an output draws is put on it automatically when the outputs leave only one answer. Otherwise it is set in the calibration's dialog (the assign tool) — Edit… here, or Needs assigning › in a Calibration card — or by dragging the output onto another output of the same calibration on the Stage. See Projection Mapping.
The calibration's dialog carries three switches at its top right — Calibration, Blending and Black level — that take the calibration, its edge blending or its black level off the wall and back in one frame. With Calibration off the screen's Warping and Overlap & Blend cards are Exaplay's own again; with Blending or Black level off the screen's VIOSO mark on the Stage says so. See Projection Mapping › Calibration, Blending, Black level.
In show off takes the output out of the show — for a monitor that is not part of it, such as the GUI monitor. It stays dark, the Stage no longer draws it, and its screen is released. Its inspector then says Not in show at the top of the Assignment card, with Include in show to put it back. Exaplay remembers the screens it showed: In show on (or Include in show) brings them back exactly as they were — unless a screen was deleted in the meantime, or the output was split differently. An output that showed nothing comes back dark, ready to drag onto a screen. See Output Setup.
A PC
Click a PC node in the open tree. The head row names it — this machine, client or offline — and, on another PC, holds its In show switch.
In show off takes the whole PC out of the show — for a machine of the rig that this show does not use. All its outputs go dark and leave the show, exactly as if you had switched each one off, and the PC disappears from the Stage. To bring it back, click + at the end of the PC row: the menu lists it under Not in show, and Include returns the PC with the outputs it took out and the screens they showed. An output you had taken out of the show on its own before stays out. This machine's own PC has no such switch — use its outputs' In show instead.
- Outputs — a list of the PC's outputs, each with the screen it shows (the open screen's in green). Nothing is assigned here — use the screen's Output Assignment, the output's inspector or a drag on the Stage; Edit opens the output. Refresh, on the card's heading, asks Windows again for this PC's monitors (it asks you first): a monitor you deleted comes back, and the monitors are laid out as Windows has them. NDI sends, placeholders and virtual outputs stay. An output keeps its screen, its settings and its name as long as its monitor is found again — at the same position, on the same connector, as the only monitor of its size, or under its number in Windows; only one that none of these finds starts unassigned. Greyed out while the PC is offline and on a locked client.
- Rendering mode — at the foot of the Outputs card: how this PC's output window shows the show. One window covers all of the PC's outputs, so this is set per PC, and it applies while show mode is on. It is a setting of the machine, not of the show: it stays on the PC across restarts and is not saved in the project. Greyed out while the PC is offline and on a client machine. See Output Setup.
- Fullscreen Topmost — the default, and the one for a show: fullscreen over the outputs, on top of every other window, the mouse pointer hidden.
- Fullscreen Background — fullscreen over the outputs, but behind every other window; the pointer stays.
- Windowed — a window with a frame that you can move and size. It opens at a quarter of the outputs' size, centred on them, and always shows the whole picture, scaled to fit. Double-click it — the picture or the title bar — or click its maximise button to switch between the full output size and the quarter.
- Not in show — the PC's outputs taken out of the show, which have no box on the Stage. Include puts one back, unassigned. The PC node in the tree says how many there are (1 not in show).
- ⚠ The monitors on this PC changed — under a red Refresh, when Windows reports different monitors than the stored outputs. The PC node in the tree is framed red and says ⚠ Outputs outdated, and the output's ⚠ badge opens this PC. Refresh then shows the change as before → now: each changed monitor's old size struck through, its new one in green, and both layouts side by side at one scale. Opening the PC re-reads what Windows reports, so a monitor you set back clears the warning by itself; Refresh re-reads it too before it asks.
- Remove from this stage (on a stage other than home) — takes the PC off the open stage; it stays in the rig and on its other stages. See Stages.
- Forget PC… (an offline PC only) — drops it and its outputs from the project. Only for a machine that is gone for good.
- The machine itself: Role, IP, Exaplay version, Fleet ID, Identify, Service; the GPU & video decoding, Host & network and Windows displays it reports; its VIOSO Cloud Platform status. The buttons at the top open that machine's Exaplay or Service interface in a new tab, or re-read its settings.
On a client machine
A machine in the client role shows Output configuration is managed by the master instance. Its Stage is read-only: outputs are assigned, arranged and calibrated on the master, and the client adopts it.
Space (3D)
With Settings → Debug mode on, a Space (3D) button sits at the canvas' bottom right. It switches the canvas to the venue in the VIOSO Experience Designer; the same button (Screens) switches back. It is not yet production-ready. See Experience Designer.
Related
- Output Setup — outputs, screens, fields, multi-machine
- Projection Mapping — warp, blend, calibration
- Projection Mapping Setup — the whole job, step by step
- Outputs Troubleshooting