
Appearance
Output Setup
Outputs are the display surfaces that Exaplay 3 renders to. You create displays — each with a size and a position — and assign them to screens. A display can be bound to a specific Windows display, bound to a machine and rendered purely by position + size, or left unbound for pre-planning.
Detected outputs
The engine enumerates the machine's connected monitors automatically — each appears in the Outputs list (e.g. Display 1, Display 2) with its detected resolution and desktop position. You don't need to add these by hand.
Adding an output manually
Use this to pre-configure an output (e.g. for a monitor that isn't connected yet) or to add an NDI stream.
- Open the Outputs section.
- Click the + (add output) button in the Outputs list header.
- Edit the new entry's properties (below) and it saves automatically.
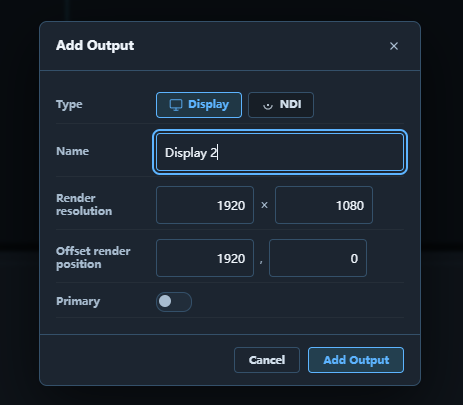
Output Properties
Select an output in the list to edit it:
| Property | Description |
|---|---|
| Name | Display name used in screen tabs and the Inspector |
| Type | Display (a monitor) or NDI (a network video stream) |
| NDI Name | Stream name advertised on the network (NDI type only; defaults to Exaplay NDI N) |
| Resolution | Width × Height in pixels (ow × oh) |
| Position (px) | X, Y (ox, oy) offset within the desktop, for arranging outputs side by side / bezel correction |
| Splitting | Split one output into a grid of Columns × Rows cells, each assignable to a different screen |
| Primary | Marks this output as the primary display |
Displays
The Displays list (top of the Outputs section) is where you create the display surfaces you assign to screens. A display has a size and a position, and is assigned to a screen. Whether it is tied to a specific monitor is a property of the display, not a separate concept — so you no longer manage "virtual displays" separately from outputs.
Adding a display
- Open the Outputs section.
- In the Displays list, click + Display (or + NDI for an NDI stream).
- A new display is created at default size 1920×1080, positioned to the right of the existing displays so it does not overlap.
- Select the display card to edit its Name, Resolution and Position.
You can also click 👁 Available to browse every output detected on this machine and on connected remote machines, then add a display already bound to one of them — or ↻ Auto-fill to create one display per discovered output at once.
Binding a display
Open a display's edit panel and use the Bind to… drop-down. There are two ways to target hardware:
| Binding | When to use |
|---|---|
| Physical output (Local Displays / Local NDI / a remote machine's outputs) | Snap the display to a specific detected monitor or NDI stream. Its size/position follow that output. |
| Machine (use position + size) | Render the display on a machine purely by its position + size — no specific monitor required. The display is drawn at its X, Y and Width × Height on that machine's desktop. |
A display can also be left unbound for pre-planning: assign it to a screen now and bind it to hardware later. Unbound and machine-bound displays expose an editable Position (X, Y); outputs snapped to a physical monitor follow that monitor's coordinates.
How machine binding renders: Exaplay opens a borderless window spanning the bounding box of the outputs assigned to a screen. A machine-bound display contributes its
X/Y/W/Hregion to that box, so it renders without needing to match an enumerated monitor.
Coordinates are per-machine
A machine-bound display's Position is a coordinate on that machine's own desktop — each machine starts at its own origin 0,0. So a display at 0,0 on the master and a display at 0,0 on a client are both valid and independent.
Because of this:
- When you bind a new display to a machine, it is placed next to the last display already on that machine (not next to displays on other machines).
- In the Outputs overview each machine gets its own lane, labelled by host, so two displays that share the same per-machine offset don't visually overlap.
Don't type a "shared canvas" coordinate into a client display's Position to push it next to a master display — that value lands on the client's desktop. Cross-machine arrangement is handled for you (next section).
Cross-machine panorama
Assign displays from different machines to the same screen and Exaplay composites them into one continuous surface — e.g. a panorama where the left half is driven by the master and the right half by a client. Across machines the displays are arranged automatically left → right by machine (master first, then each client), so a master display + a client display read as a single wide screen. Within a single machine, displays tile by the Position you set. See Multi-Client Setup for the networked workflow.
Multi-Screen Layout
Use the Layout Editor (drag-and-drop grid in the Outputs panel) to visualise and arrange the physical placement of screens relative to each other.
Warp & Blend
Geometric warping and edge blending are configured per screen/field, not on the output itself. See Projection Mapping for full details.
Test Pattern
Use Generate Test Pattern to open an external test-pattern generator in a new tab — handy for producing colour bars / alignment cards to play back while configuring outputs.
Output-List File
The display configuration is stored in the project under project.system["output-list"]; a snapshot is also written to output/output-list.json. Each entry uses these fields:
json
[
  {
    "display": "display_1",
    "name": "Display 1",
    "type": "display",
    "ow": 1920,
    "oh": 1080,
    "ox": 0,
    "oy": 0,
    "col": 1,
    "row": 1,
    "primary": true,
    "owner": ""
  }
]| Field | Description |
|---|---|
display | Stable output id (e.g. display_1) |
name | Display name |
type | display, ndi, or region (a display bound to a machine by position + size) |
ow / oh | Width / height in pixels |
ox / oy | X / Y position on the desktop |
col / row | Cell index when the output is split (1-based) |
primary | Whether this is the primary display |
owner | Varname of the screen assigned to this output (empty if unassigned) |
ndi_name | NDI stream name (NDI outputs only) |