
Appearance
Controlling an Attraction Ride with Data Tracks
This guide covers using Exaplay 3 as the media and automation backbone of an attraction ride — a dark ride, simulator, or themed experience where video, audio, lighting, and motion effects must all play back in precise synchronisation, triggered by a ride-control system.
Typical Attraction Architecture
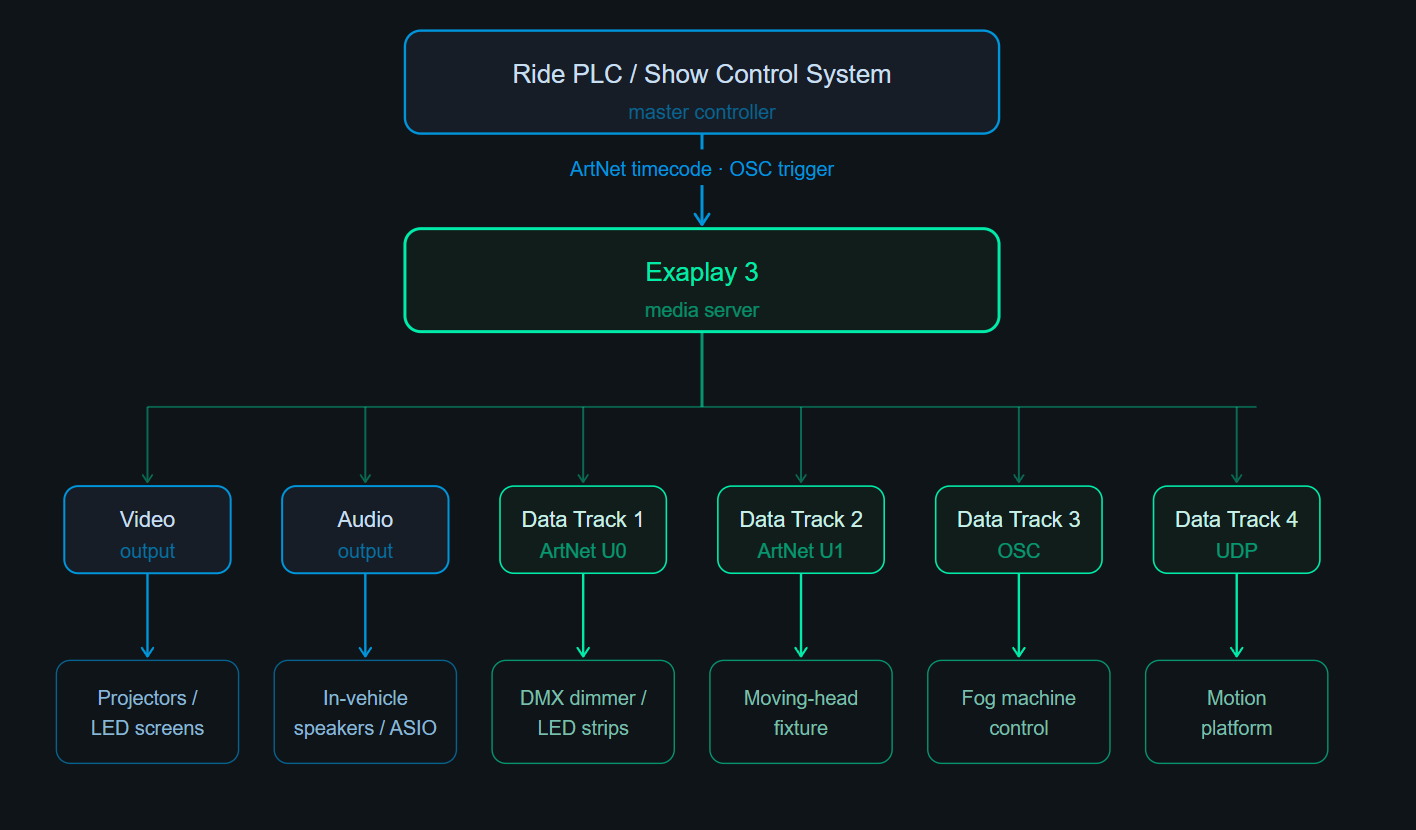
Part 1 — Timecode Synchronisation
The ride PLC must be the master clock. Exaplay 3 runs as a slave, locking its playhead to the incoming timecode.
Option A — ArtNet Timecode (planned; not available in this build)
Not available in this build. ArtNet timecode receive is not yet wired up. For a lighting console as master clock today, use Option B — OSC Timecode or LTC/MTC instead (see Timecode & ArtNet Sync). The steps below describe the planned behaviour.
- Open Config → Network → ArtNet.
- Enable Receive ArtNet Timecode.
- Ensure the console and Exaplay are on the same subnet (ArtNet timecode is broadcast and not addressed to a universe).
- The Transport bar shows TC: Locked in green when sync is established.
Option B — OSC Timecode
- Open Config → Network → OSC.
- Enable Receive OSC Timecode.
- Set the listen port (default
8000). - The show control system sends
/timecode/hh/mm/ss/ffmessages.
Option C — LTC (Linear Timecode)
- Connect the LTC audio signal to an input on the ASIO audio interface.
- Open Config → Audio Settings → Timecode Input.
- Select the channel, set the frame rate (24/25/30), confirm lock.
Safety note: For a live attraction, always use Slave mode (not Jam Sync). If the PLC pauses or stops timecode, Exaplay 3 must pause or stop too — it should never run ahead of the ride system.
Set Timecode Mode → Slave in Config → Video Settings.
Part 2 — Building the Show Timeline
With timecode sync active, build the full ride experience as a single composition with all elements locked to the ride's timecode:
Timecode    00:00:00:00 ──────────────────────── 00:05:00:00

Track 1 (Video)    [Pre-show intro] [Main ride sequence] [Ending]
Track 2 (Audio)    [Soundtrack + dialogue                        ]
Track 3 (Data)     [DMX dimmer keyframes                         ]
Track 4 (Data)     [Moving head position                         ]
Track 5 (Data)     [Fog trigger                                  ]
Track 6 (Data) [Motion platform keyframes ]Setting Frame Rate
Make sure the project frame rate matches the ride's timecode:
- Open Config → Video Settings → Frame Rate.
- Set to 30 fps (typical for rides with SMPTE timecode) or 25 fps (PAL systems).
Part 3 — DMX Lighting Control via Data Tracks
Each lighting channel becomes one Data Track targeting an ArtNet universe and channel.
Example: Ride Scene Lighting
Scene:  "Cave 1" entrance (0:30 → 0:45)
Goal:   Dimmer fades from 0 to 80%, strobe flashes, then fades out

Data Track "Cave1_Dimmer":   Universe 0, Channel 1
  keyframes:  0:30:00 → value 0
              0:35:00 → value 80
              0:40:00 → value 80
              0:45:00 → value 0

Data Track "Cave1_Strobe":   Universe 0, Channel 2
  step interpolation (immediate jumps):
  keyframes:  0:38:00 → value 255  (strobe on)
              0:38:15 → value 0    (off)
              0:38:22 → value 255
0:38:30 → value 0Step-by-step
- In the Sub-header, click the Data panel.
- Click + Data Track.
- Set:
- Name:
Cave1_Dimmer - Output Type:
ArtNet - Universe:
0 - Channel:
1 - Destination IP:
192.168.1.50(your ArtNet node / dimmer)
- Name:
- Click on the Data Track ruler at
0:30:00to add the first keyframe. Set value to0. - Add more keyframes at each timecode where the value changes.
- Repeat for each DMX channel.
See ArtNet & DMX Output for packet format and multi-universe details.
Part 4 — OSC Control for Practical Effects
For effects that don't use DMX — fog machines, pneumatics, water effects — use OSC output Data Tracks to trigger the effect controller.
Example: Fog Machine at 01:10:00
Data Track "FogMachine":   Output Type: OSC
  OSC Address:  /fog/trigger
  Destination:  192.168.1.60:9000

  keyframes (step interpolation):
  01:10:00 → value 1   (trigger ON message)
01:10:05 → value 0 (trigger OFF message)The effect controller receives /fog/trigger 1 at exactly 01:10:00 in the timecode stream, and /fog/trigger 0 five seconds later.
Part 5 — UDP to Motion Platform
Some motion platforms accept a simple UDP packet containing a float value for each axis. Use a UDP Data Track per motion axis:
Data Track "MotionPitch":  Output Type: UDP
  Destination:  192.168.1.70:9500

  keyframes:
  00:30:00 → value 0.0
  00:31:00 → value 0.8   (nose up)
  00:32:00 → value -0.3  (nose down)
00:33:00 → value 0.0 (level)The UDP datagram contains the value as a 4-byte big-endian float. Check your motion platform's documentation for the expected packet format.
Part 6 — Emergency Stop and Safety Interlocks
In a live attraction, the ride PLC is responsible for safety. Exaplay 3 must respond correctly to emergency events:
PLC Stops Timecode → Exaplay Freezes
In Slave timecode mode, if the incoming timecode stops, Exaplay's playhead also stops. Media freezes on the last frame. When timecode resumes, playback continues from the correct point.
E-Stop Cue
Add a dedicated cue called E-STOP:
- Action: Stop all playback immediately (hotkey:
Escape) - Visual: Fires a
Fade to blackcomposition
Assign this cue as a hot key (Escape or a dedicated button on the operator's control hardware).
In a real installation, the PLC should also be able to trigger the E-STOP cue via OSC:
bash
# PLC sends:
POST http://192.168.1.5:8123/cue/trigger
{"name": "E-STOP"}OSC dispatches by composition + cue index, not by name — for a name-keyed trigger like E-STOP, prefer the HTTP endpoint above. If the E-STOP cue lives at a known index in (e.g.) comp_main, OSC works too:
/exaplay/comp_main/cue <e-stop-index>Part 7 — Operator Monitoring
During ride operation, the technical operator watches the Monitor tab and Diagnostics Panel:
| What to watch | Where |
|---|---|
| Timecode lock status | Transport bar (green TC: Locked indicator) |
| Engine FPS (must stay at project frame rate ±1) | Diagnostics Panel |
| Data Track transmission events | Monitor → Event Log |
| ArtNet output confirmation | Monitor → Event Log (ArtNet packets listed) |
| OSC output confirmation | Monitor → Event Log (OSC messages listed) |
If ArtNet packets appear in the Event Log but the fixture doesn't respond, the issue is in the DMX cabling or fixture configuration — not Exaplay.
Part 8 — Robustness for Daily Operation
Attraction rides typically run 10–14 hours per day, 7 days a week. Configure Exaplay for maximum resilience:
Auto-Heal
Enable Auto-Heal (Settings → Auto-Heal). The state is saved every 2 seconds; if the engine crashes between ride cycles, it restores the correct position and resumes.
Ride Cycle Scheduler
Use the Scheduler to reset the show to timecode 00:00:00:00 between ride cycles if the PLC does not send a hard reset:
- Add a Scheduler event:
every ride cycle end time→Fire cue: Reset. - The
Resetcue jumps the timeline to the beginning and pauses, waiting for the next ArtNet TC sync from the PLC.
Nightly Restart
Add a Scheduler event at 03:00 → Stop. The watchdog service restarts the engine. This clears any accumulated memory fragmentation from a full day of operation.
Summary Checklist
- [ ] Timecode mode set to Slave; TC lock verified in Transport bar
- [ ] Project frame rate matches the ride's timecode standard
- [ ] Video and audio tracks built and synced to timecode
- [ ] Data Track created per DMX channel (ArtNet universe/channel configured)
- [ ] OSC Data Tracks created for practical effects
- [ ] UDP Data Tracks created for motion platform axes (if applicable)
- [ ] E-STOP cue created and accessible via Escape key and remote control command
- [ ] Auto-Heal enabled; Watchdog enabled
- [ ] Nightly restart scheduled
- [ ] Operator monitoring: TC lock, FPS, Event Log confirmed healthy